The problem of urban illumination is becoming more and more important every year – new houses, new roads, illumination, thoughtless design of urban lighting lead to the fact that the sky turns into a solid orange canvas, and because of the bright background it is impossible to capture even bright nebulae. The situation changed dramatically after the appearance of specialized light pollution suppressor filters for astrophotography. The use of interference coatings made it possible to cut off unnecessary regions of the spectrum — for example, the emission lines of mercury and sodium lamps, and to transmit the regions of interest — emission lines of hydrogen and oxygen.
There are several varieties of light pollution filters — broadband and narrowband. In broadband filters include CLS (City Light Suppression), LPR (Light Pollution Reduction), UHC (Ultra High Contrast), UHC-S. They may be under different brands, but they have one task – to weaken the illumination of city. The UHC bandwidth is narrower in the green area, they are more suitable for heavily exposed areas, but it’s harder to get the corrent white balance. The usual bandwidth in the green region is from 20 to 75 nm. The narrower the filter, the darker the background is. Also, CLS UHC filters can pass the red region of the spectrum – this is not important for visual observation, but it is very important for photography, since the emission line of hydrogen nebulae (H-alpha) is in that area.
Narrow-band filters emit a certain line of spectrum – hydrogen, oxygen, sulfur, calcium, etc. The width of the transmission of visual narrowband filters is less than 20 nm, photographic filters are less than 12 nm. Such filters are suitable for astrophotography in high light pollution, but for visual observations it is still better to choose darker places.
UHCCLS filters work well for gas nebulae, but for stellar objects (clusters, galaxies), the effect is insignificant.
In addition, there are CCD-labeled filters – they have a built-in IR-cut filter that cuts off infrared and ultraviolet light. In the IR range, optics may have uncorrected chromatism, which will create red halos around the stars. If there is no built-in IR-cut filter in the camera, it is better to take the CCD modification of the filter, or use a external IR-cut filter. Almost all amateur cameras have a built-in filter that blocks infrared radiation, but it can partially block the H-alpha line as well. Removing the filter can improve the sensitivity to the hydrogen line several times.
The form factor of the filters is different – there are filters with a fit of 1.25 “and 2”, which are handed into the eyepiece, corrector or T-adapter, as well as clip-filters intended for installation in certain models of amateur cameras (Canon, Nikon).
I got experience with light pollution filters about 10 years ago after buying a Baader UHC-S 1.25 filter. It perfectly suppresses light pollution, but the white balance is completely misaligned. However, with this filter, Jupiter-37A lens and the unmodified Canon 1000D camera I was finally able to capture the Horsehead Nebula. In 2017, I finally decided to mod my Canon 550D camera (removing the IR filter) and the world of hydrogen nebulae opened for me. Then followed the purchase of a 12 nm narrowband hydrogen filter and monochrome astrochrome QHY5III178m. Sensivity to the hydrogen line after the modification risen considerably, but there were also unpleasant red halos with photographing lens .
When using soviet M42x1 camera lenses and Canon cameras, I used an inexpensive M42x1 EOS adapter. If the photo lens has a rear lens far enough from the adapter (for example, Jupiter-37A or Jupiter-21M), then the adapter can be fitted with a 1.25 “filter through a small ring. Also, 2” filters can be installed in front of the lens. After buying a Samyang 1352.0 ED photo lens with a Canon bayonet, I got a problem – a 1.25 “filter has nowhere to insert, and a 2” filter is too small and correctly works with aperture ratio to F2.8. The solution was the purchase of a Svbony CLS clip EOS clip-filter. Why CLS, not UHC? Firstly, it is not so dark. Secondly, there is hope to get an adequate white balance – with a UHC filter, a bicolor is obtained (hydrogen H-alpha + oxygen OIII + hydrogen H-beta). Thirdly, in city backyard capturing the illumination still slightly supress, and I would like to cut it off with the most broadband filter. Alas, there are no CLS UHC filters marked with CCD on Aliexpress, and they cost several times more. Therefore, I decided to sample the inexpensive CLS filter.
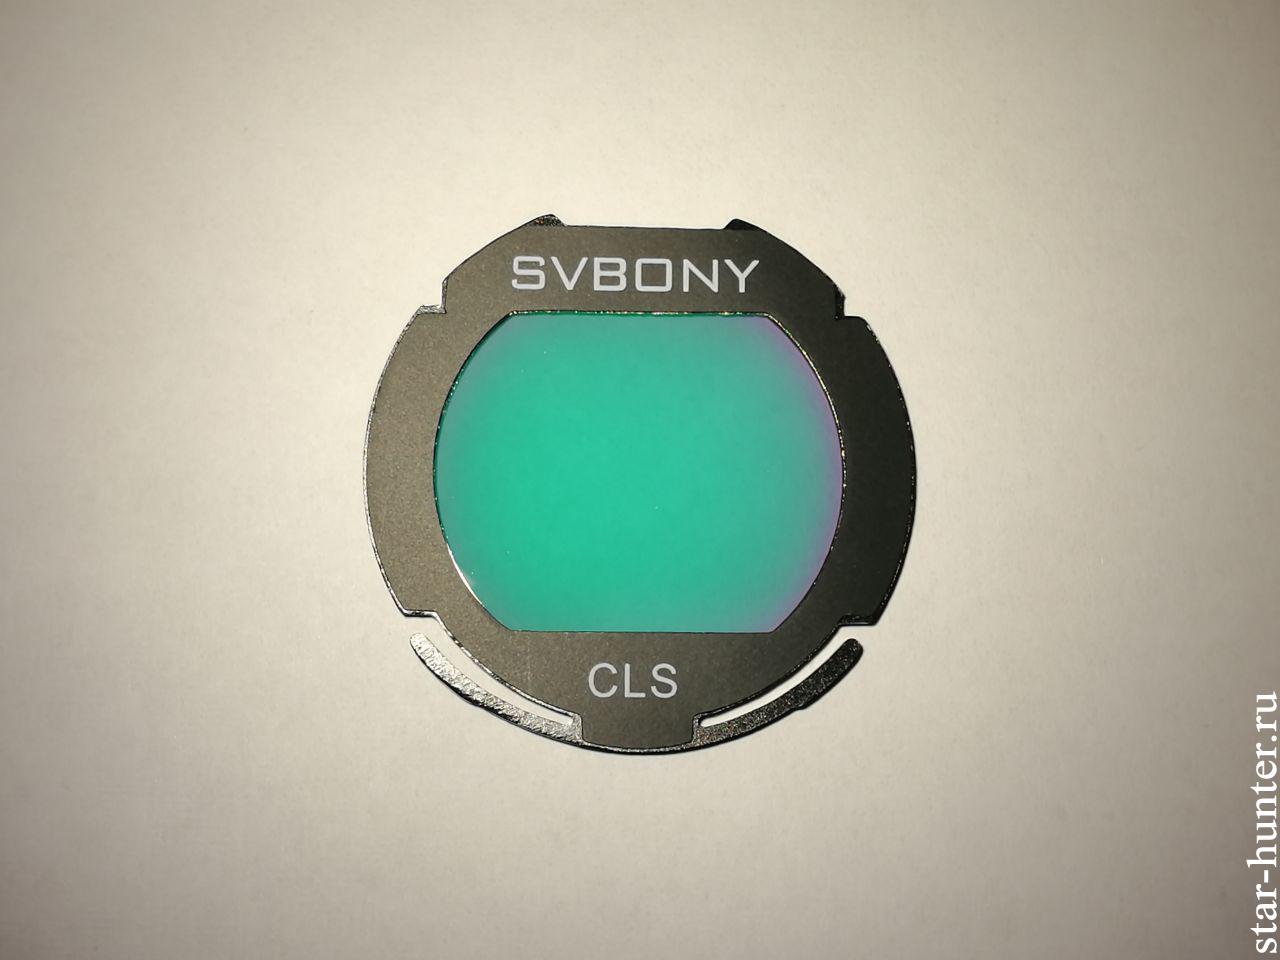
The filter is supplied in a box marked SVBONY CLS EOS-C. Inside the box is a durable plastic box. The metal filter frame was a pleasant surprise – I expected to see a plastic construction. Blackening rims dark frosted. If you look at the filter directly, it is green, if at an angle, it goes to a purple-pink color – this is normal, because the bandwidth of the filter depends on the angle of falling of the light. The quality of the filter itself is very good, free of defects.


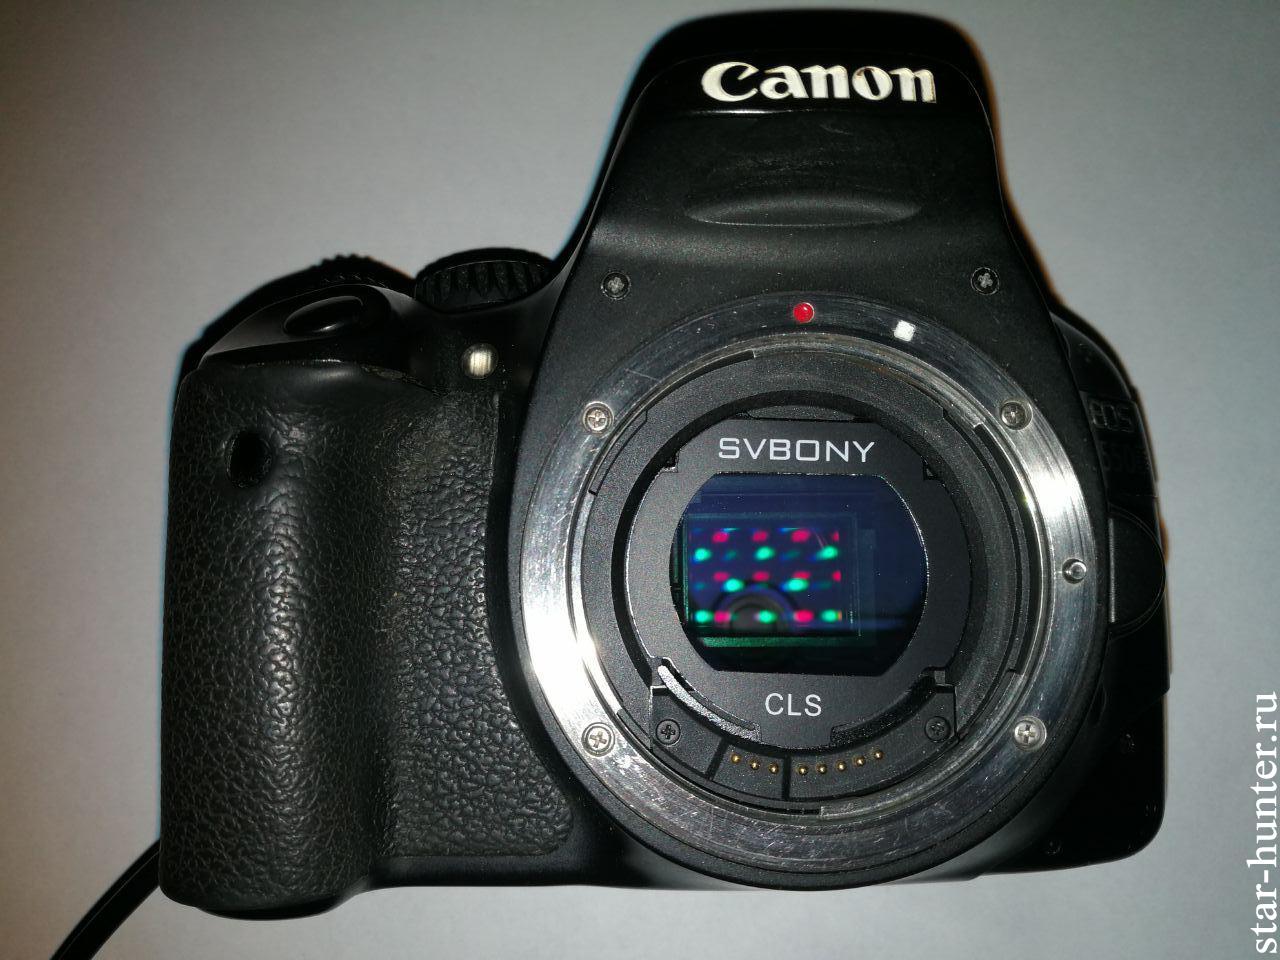
Installation of the filter is very simple and takes less than a minute. I insert the bottom of the filter first, then press it down a little with my finger until the filter locks into place. To remove the filter, it is enough to pick up the upper part of the filter. Of course, caution and care should be taken (especially for hands-from-ass persons) so as not to dirty and scratch the filter and the camera’s mirror. In case of severe fingerprint or dust pollution, the filter can be cleared with liquid dishwashing detergent (not abrasive!), rinsed with warm tap water and then rinsed with distillation water. I don’t recommend cleaning it with rags and LenPen, you don’t need to blow away dust particles either, especially with your mouth – you can easily stick it with saliva. Installed and forgotten – all the same, all the dust will be removed by calibration flat frames.
Be careful – the use of EF-S lenses with this filter is UNACCEPTABLE, as the filter may be damaged. When shooting with M42x1 lenses, also ensure that the rear lens or the lens housing does not rest against the filter. With lenses such as Jupiter-37A or Jupiter-21M problems should not be, they have a rear lens located far from the plane of the filter.
Speaking of flat. I recommend using a white light source – for example, a laptop or tablet monitor. When shooting with a blue electroluminescent lamp, problems arose with very noisy flat in the red channel.
The following equipment was used for testing:
-Canon 550Da (modified, removed infrared filter), white balance “sunny”
-Canon EF 402.8 STM
-Samyang 1352.0 ED Canon EF
-filter Svbony CLS clip
-filter Baader UHC-S 2 “Visual & Photographic
-filter Solomark IR-UV cut 2 “
-Mount Sky-Watcher Adventurer.
Location: Russia, Anapa, backyard.
Some charts:
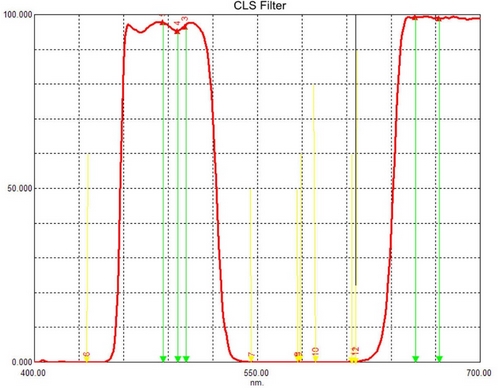
According to Baader UHC-S, there is no stated schedule, but there are several measured
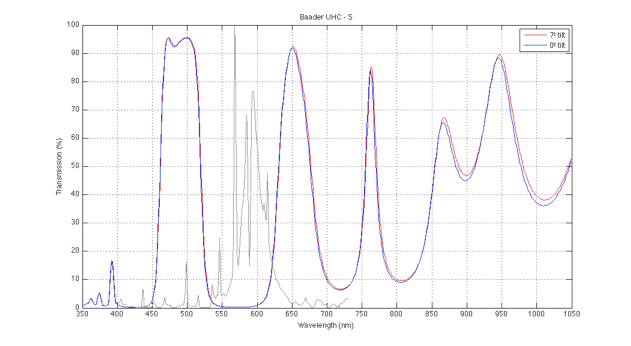
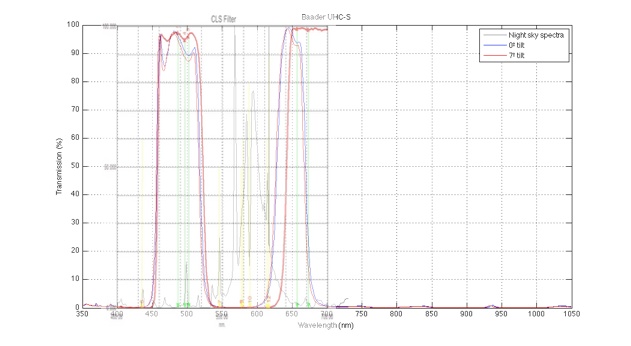
After applying and adjusting the graphs, it turned out that the filters in the green area are very similar:
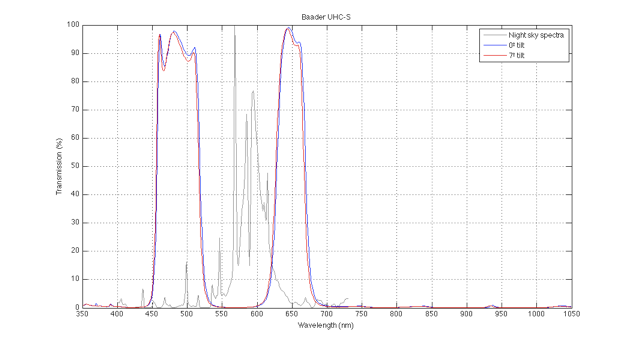
With a help little spectroscope, Canon 550Da camera and LED flashlight I got the following spectra. The green bar is a laser beam with a wavelength of 532 nm.
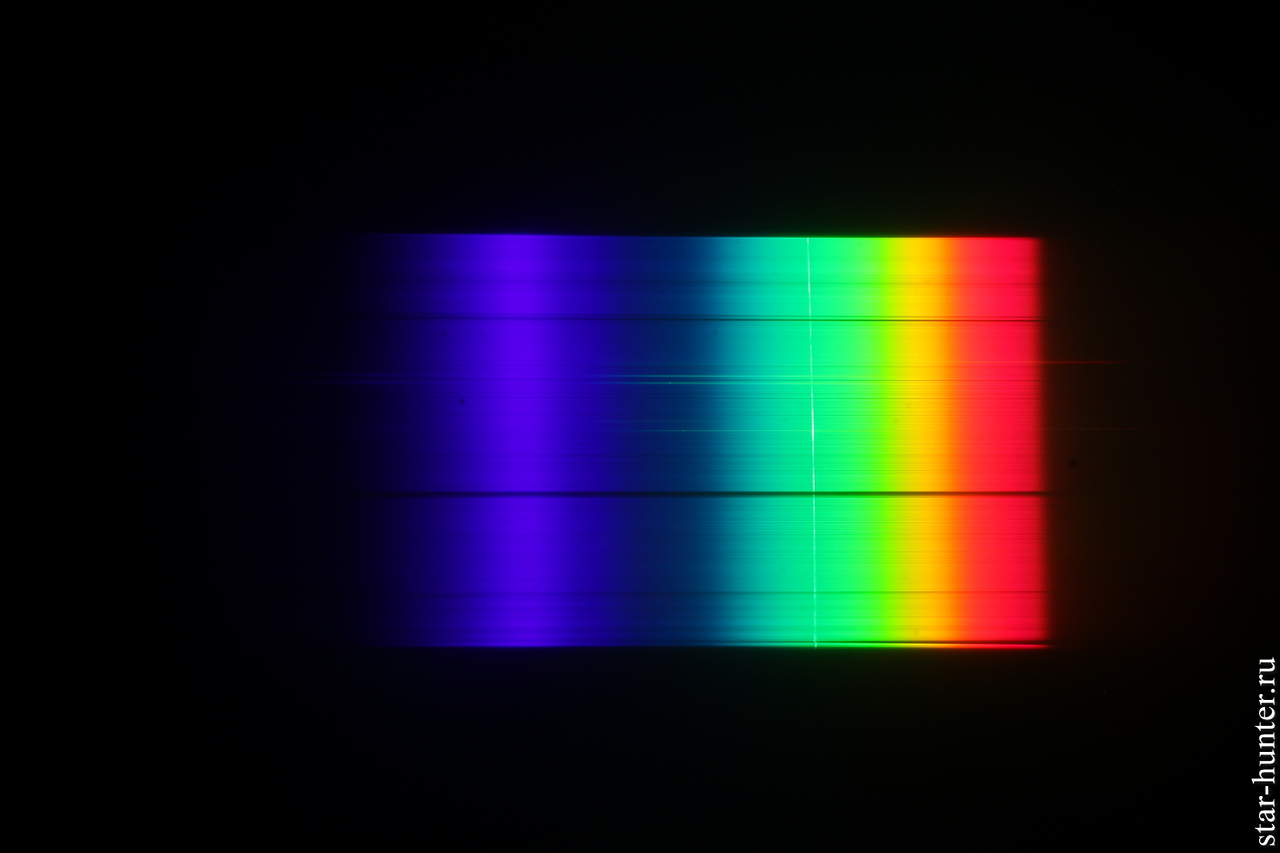

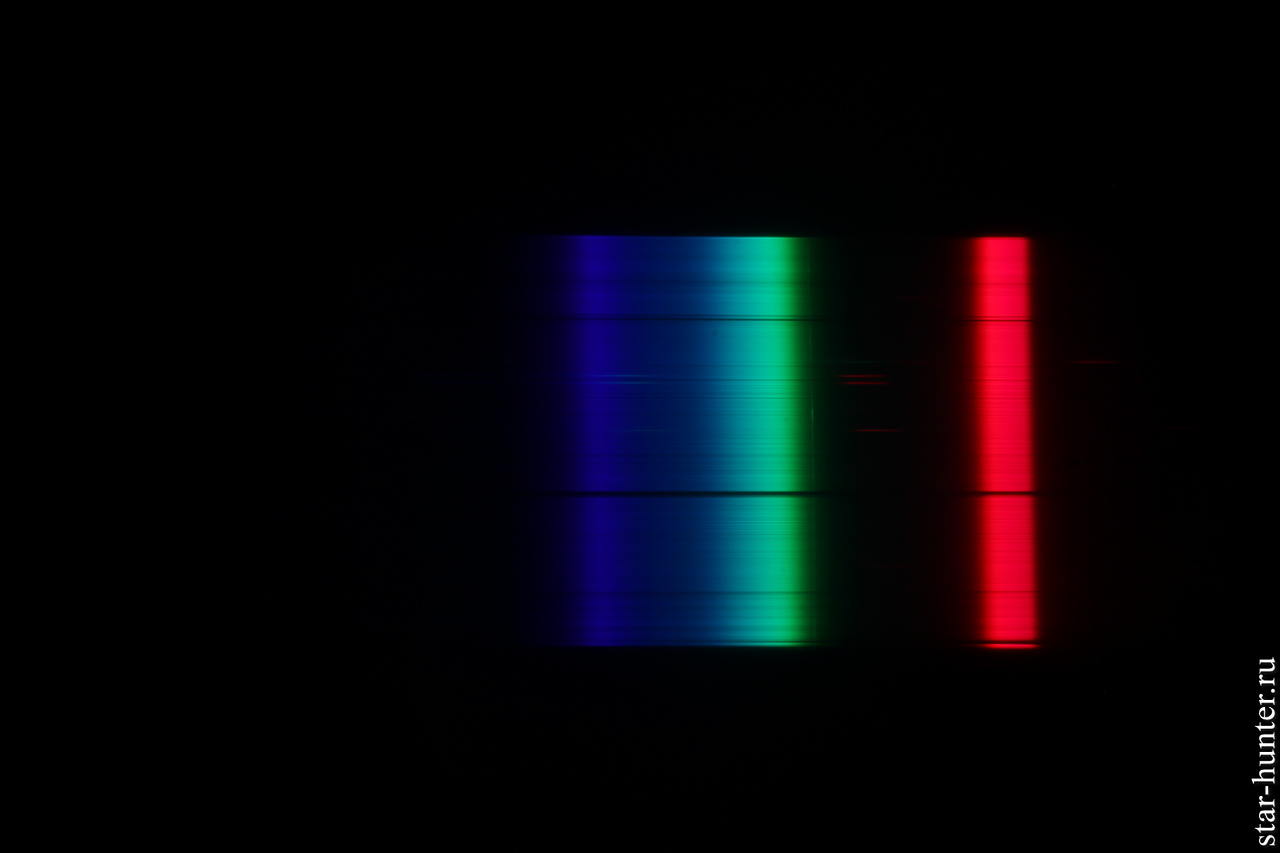
Interesting results. Svbony CLS was narrower in the blue-green area. The red area is shifted as in the graph. This means that with UHC-S there will be noticeably more blue – in terms of obtaining at least some white balance, this is a plus, but the suppression of illumination is a little worse.
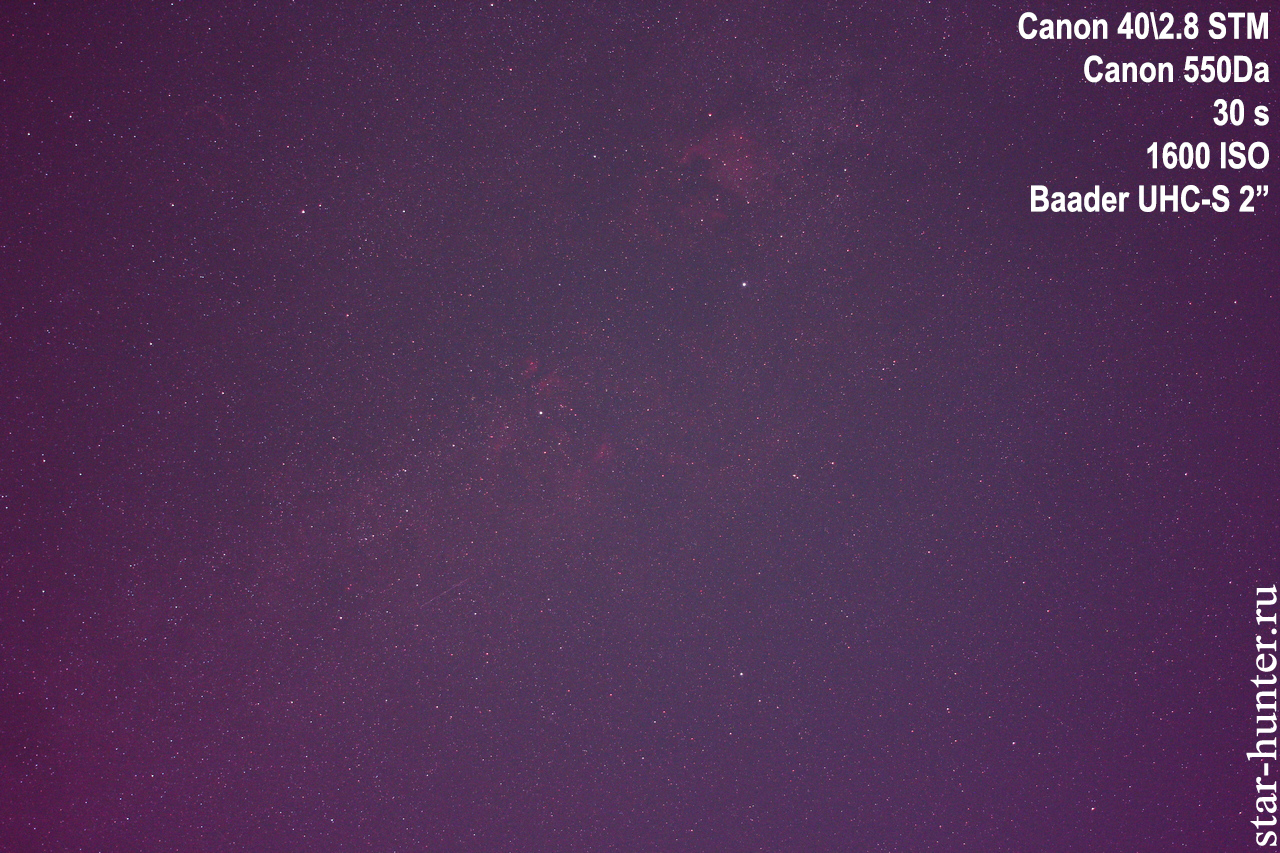
Well, let’s move on to testing in the sky. I want to note that when using filters in light pollution it is necessary to increase the shutter speed or ISO 2 times than when shooting without a filter to get a brighter result. Solomark IR-UV cut filter was not used.
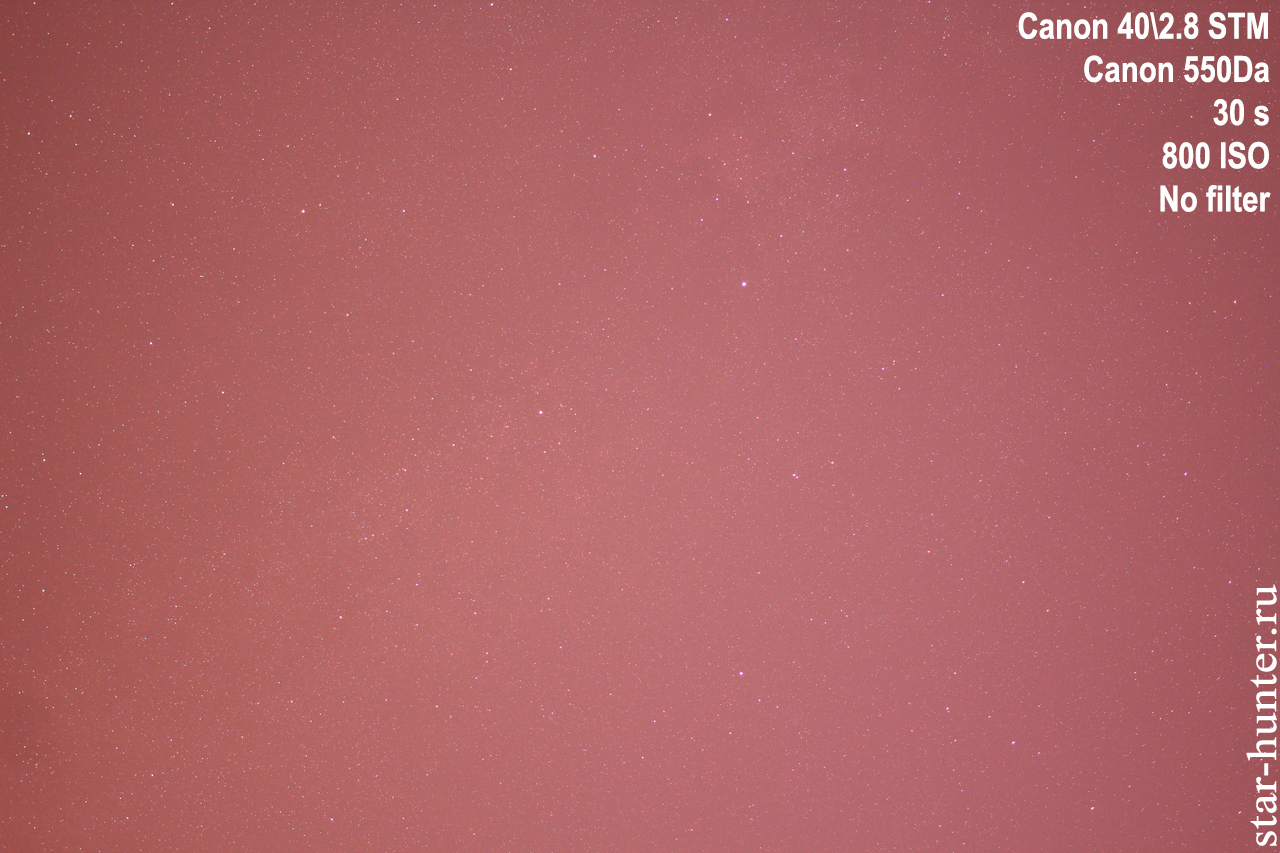

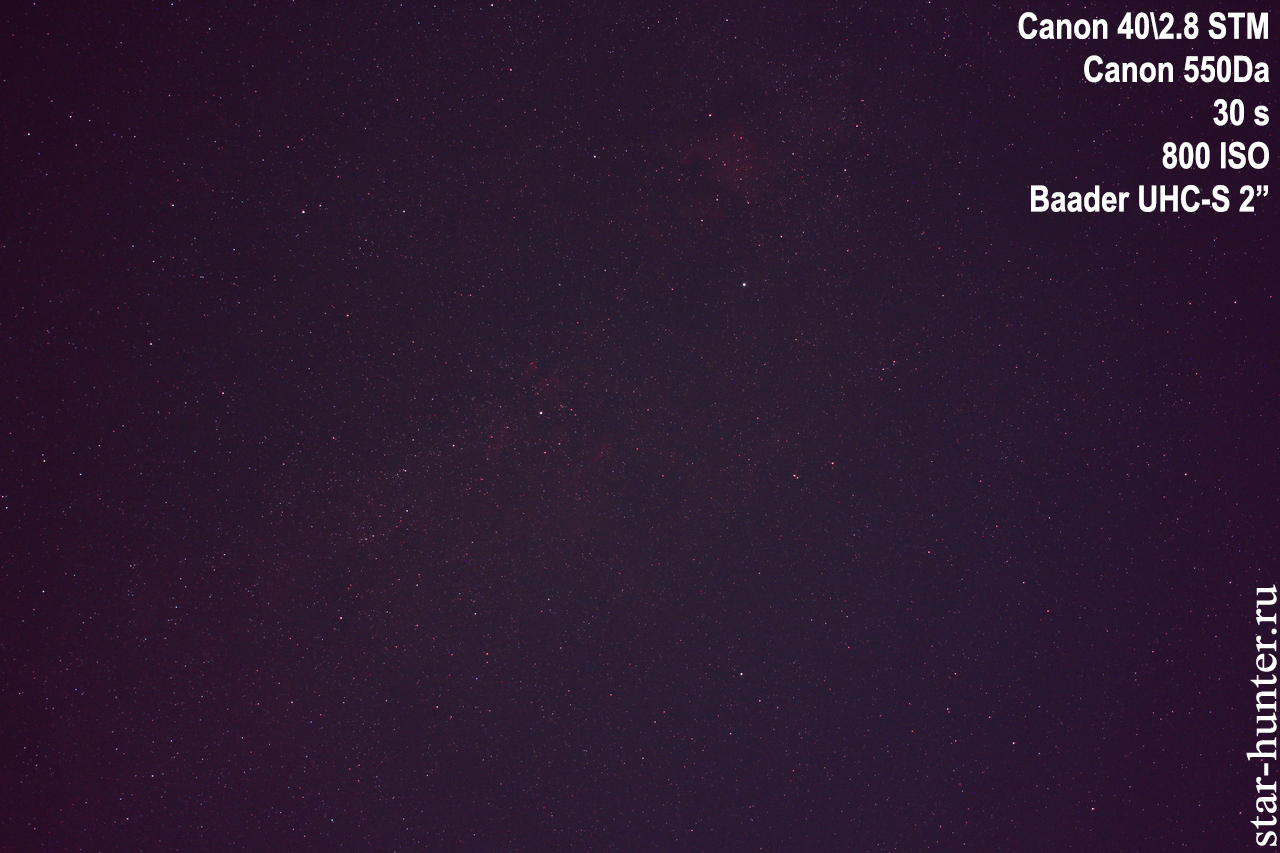
Increase ISO to 1600:

Animation at link.
Well, what can I say – Baader has more blue and less green, the red channel is almost the same, but Svbony has a slightly wider histogram hump. It should be noted that Baader UHC-S worked in full-aperture mode (in front of the lens), while Svbony worked in sub-aperture mode (between the lens and camera), therefore the angle of incidence of the rays on the filters was different – in terms of the uniformity of the background, the victory for Svbony. However, I recommend using lenses with a focal length of more than 85 mm for shooting, otherwise the uneven background at the corners of the frame will create major problems during processing.
Slightly improves the uniformity of the background Solomark external filter IR-UV cut, it also significantly weakens the red channel. Alas, he does not solve the problem of red halos around stars. The shooting parameters are the same as ISO 1600.
Svbony CLS clip + Solomark IR-UV cut
Baader UHC-S + Solomark IR-UV cut
But the most obvious was shooting with a Samyang 135 2.0 ED lens. Neighborhood of the NGC 7000 Nebula:

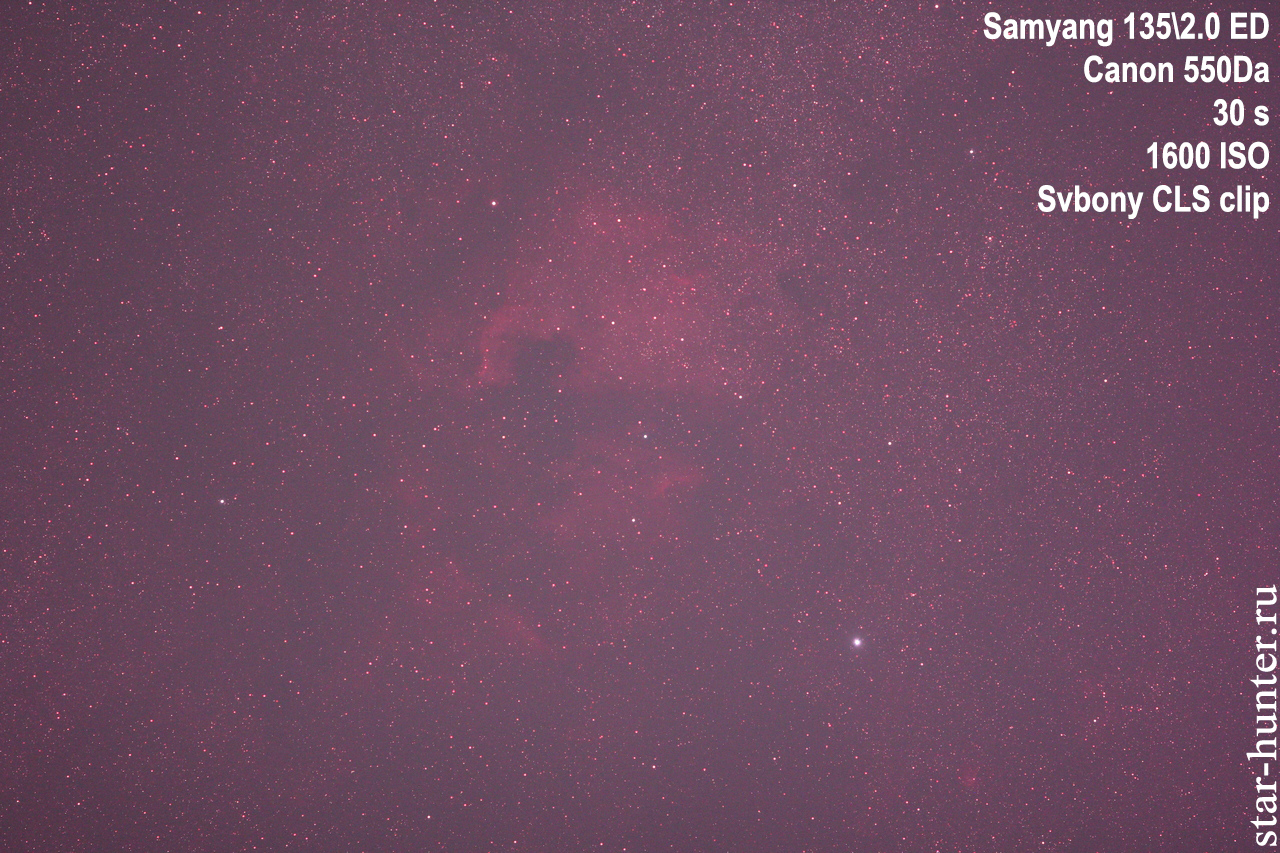
Reducing the ISO to 400 did not give such an effect of highlighting the nebula.

Another test for the low-lying Orion Nebula.
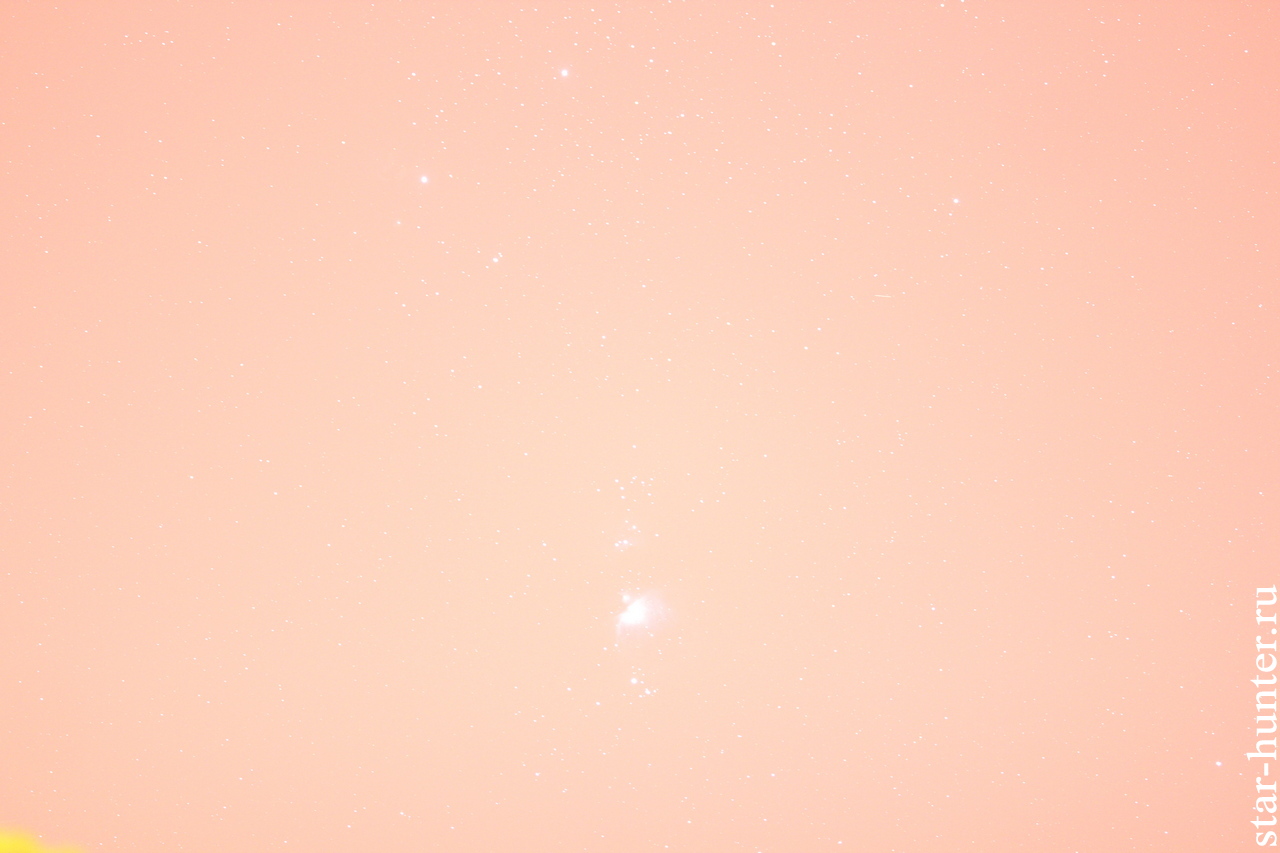
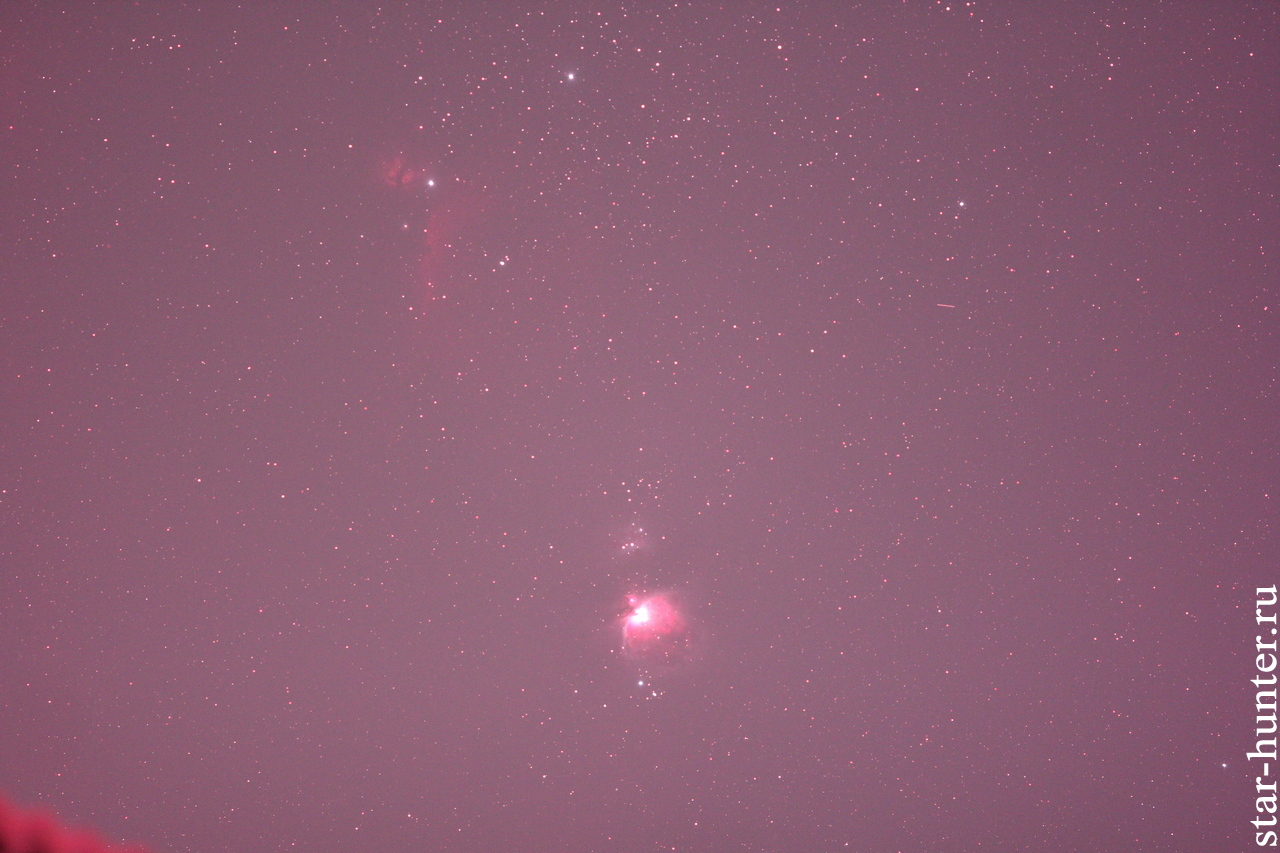

Verdict: the filter showed itself perfectly in conditions of strong urban illumination – you can see for yourself how badly the background affects the visibility of nebulae. Of course, the camera’s modification played an important role here – without removing the built-in IR-cut filter, the nebula would be much weaker, but even without the modification, the filter does its job – cuts off the illumination. Of course, the CLS filter does not replace the dark sky, it does not work well for stellar objects (clusters, galaxies), and there may be problems with obtaining an correct white balance, but if you cannot go out of town, it’s better with a filter than without it. Blue and green channels are similar, it turns out almost “bicolor”. Better ligth pollution suppression is implemented in Optolong L-Pro filters, but their price is much higher. In general, I recommend to buy.
I will post the result of adding the pictures later. Have questions? Ask.
