Sky-Watcher AZ-GTi mount on the Star Adventurer tripod review

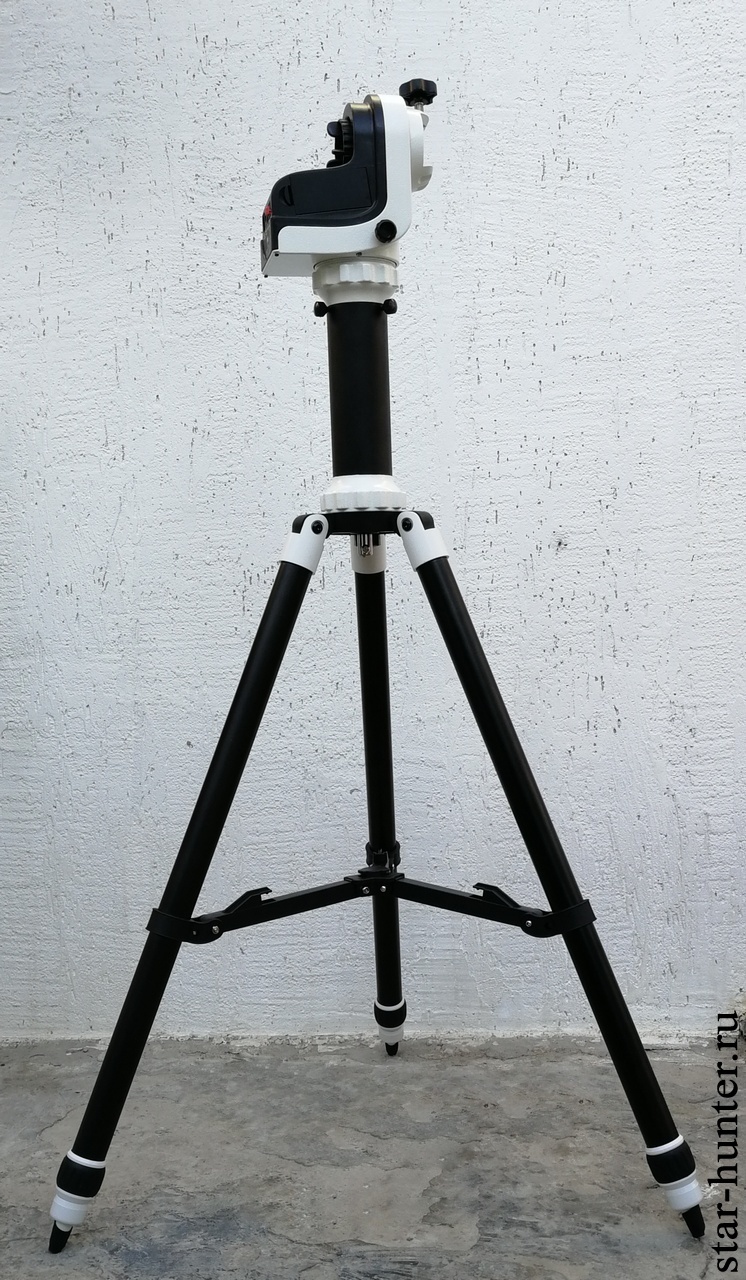
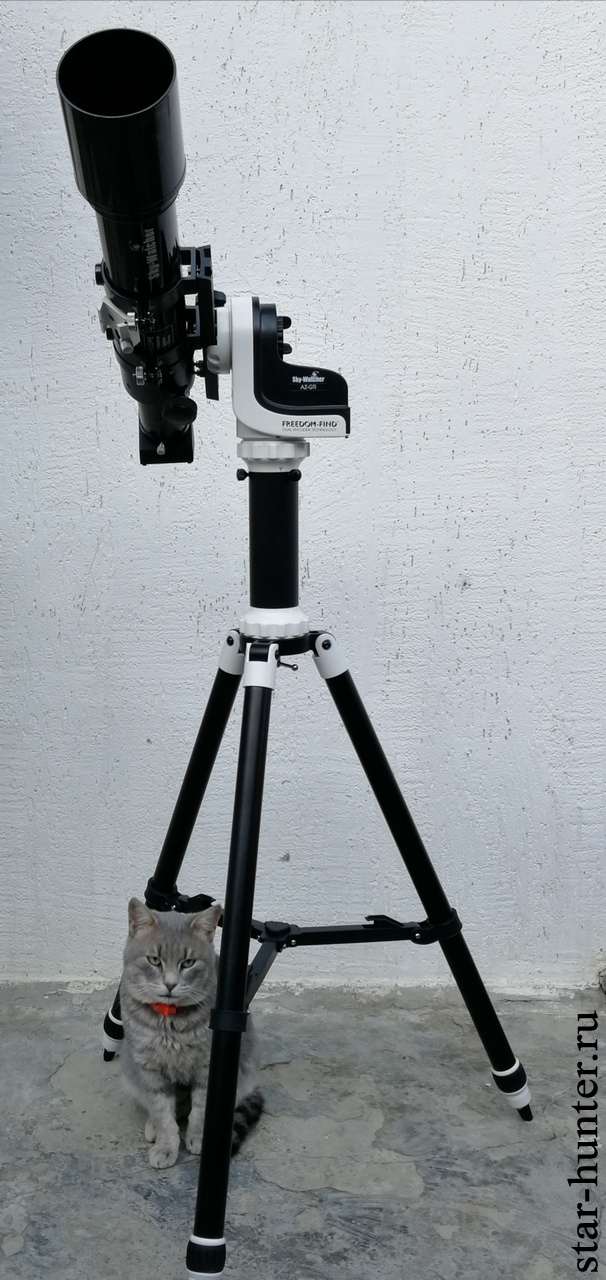
I recently became the owner of an interesting Sky-Watcher AZ-GTi mount on a Star Adventurer tripod. With a mount weight of only 1.3 kg, its maximum load capacity is 5 kg. The mount is equipped with dual encoders, that is, after alignment to the object, the mount can be rotated by hand, but the alignment will not be lost. The mount is controlled via Wi-Fi using the SynScan Pro application from a smartphone tablet (Android, iOS) or from Windows PC. You can connect a Synscan hardware remote control to the mount by pre-crimping the cable in a specific pinout. Sky-Watcher AZ-GTi is suitable for both beginners and advanced astronomy enthusiasts who need a multifunctional azimuth mount mount with built-in motors, Go-To, Wi-Fi and the ability to work in equatorial mode.

Sky-Watcher AZ-GTi на треноге Star Adventurer
Sky-Watcher AZ-GTi on Star Adventurer tripod

General
A mount is a device designed to guide a telescope tube to an object. In most cases, the mount is a part of the telescope between the tripod and the optical tube. In alt-azimuth mounts, aiming is carried out in azimuth and height (left-right, up-down), in equatorial mounts – in right ascension and declination. The azimuthal mount can be converted to the equatorial, by directing its axis of heights to the pole of the world. In this case, azimuth becomes right ascension, and latitude becomes declination. For tilting, a special device is usually used – the equatorial wedge. There are also motorized mounts with compensation for Earth rotation. In this case, the object does not escape from the field of view and it can be examined in detail, which is especially important in observations with high magnification.

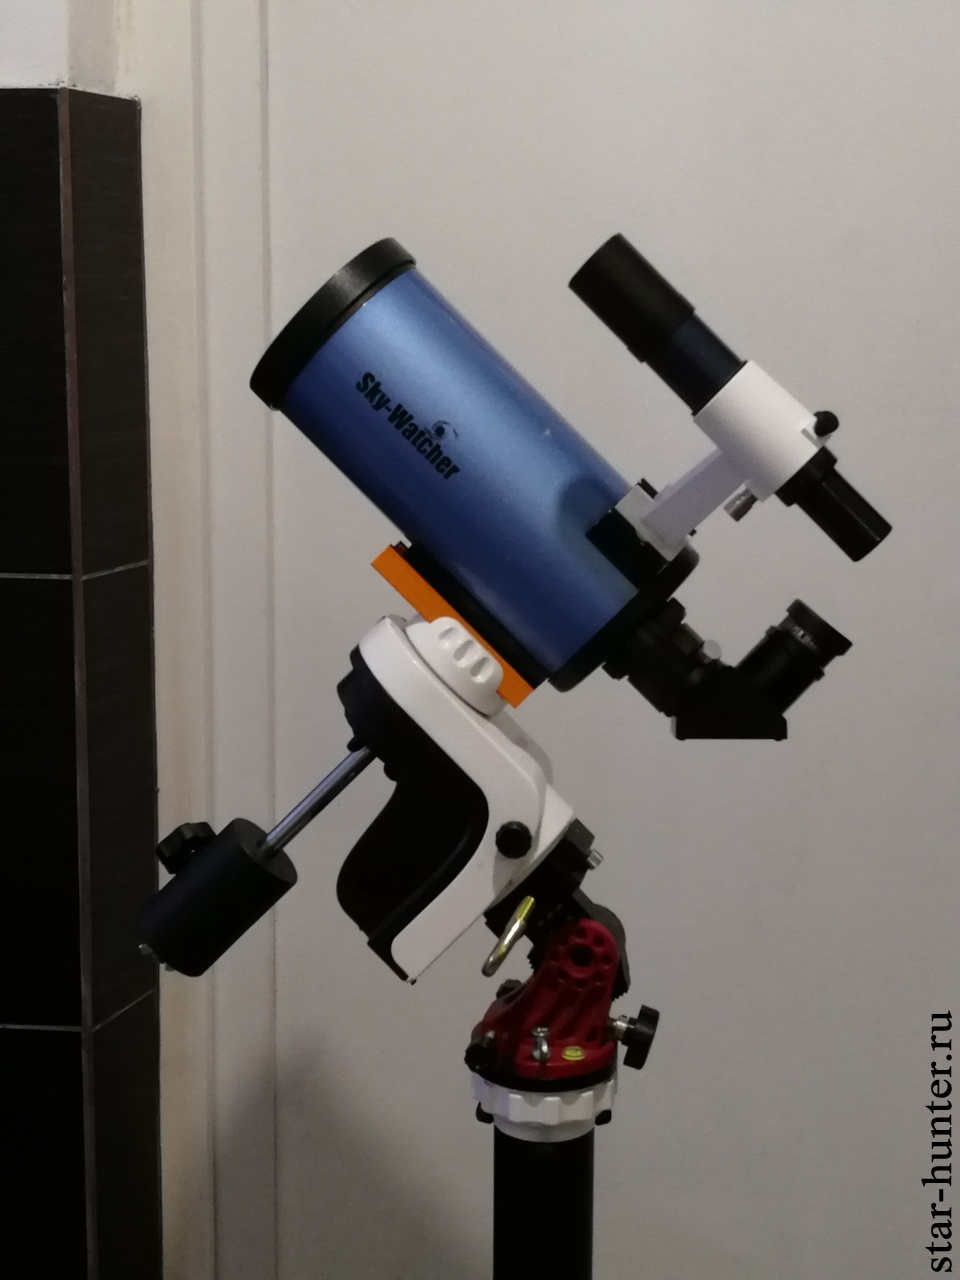
Initially, the Sky-Watcher AZ-GTi mount was positioned by the manufacturer as azimuthal, but the developers released firmware for it with the addition of the equatorial mode, as well as the location of the mounting plate on the right (Firmware: AZGTi Mount, Right Arm, AZ / EQ Dual Mode). This significantly raised the interest in mounting among astrophotographers. You can update the firmware via Wi-Fi. Due to its small size, the mount can also be used as a mini-tracker.

The manufacturer himself warns that the mount was not intended for astrophotography, the updated firmware was made for advanced users, the efficiency in astrophotography is not guaranteed, and, as a rule, the user may encounter difficulties in obtaining the expected result.
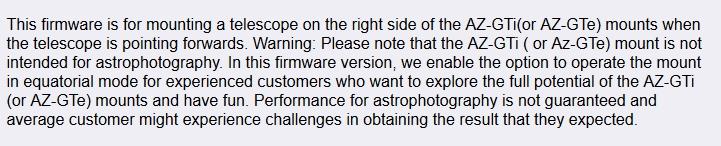
An important difference from the Sky-Watcher AZ-GTe mount is the presence of double encoders and the ability to rotate hands with weakened axle frictions.

Manufacturer’s specification:

Controller: Free SynScan App for iOS and Android mobile device or Synscan Hand Controller (available separately)
SynScan App Database: Total 10,000+ Objects. Deep Sky Objects: 10759, including Messier, NGC, IC, Caldwell Catalogues, Named DSOs, Named Stars: 305, Double Stars: 55, Solar system objects: 7 planets, Sun , Moon. (Unlimited objects when working with a 3rd party planetarium software).
SynScan App Alignment Method:  Brightest Star Alignment, North-Level Alignment
SynScan App’s Other Features:  Tonight’s Best Sky Tour, Point and Go with a mobile device, Identification of Celestial Objects, Remote control over Internet, User defined objects, Pointing Accuracy Enhancement (PAE)
Pointing Accuracy: Up to 10 arc-minute (RMS)
Resolution: 2073600 Counts/Rev., 0.625 arc-second
Resolution of Aux. R.A./Dec. Axis Encoders: 1068 Counts/Rev., approx. 20 arc-minutes
Tracking Technology: Freedom-Find™ Dual-Encoder
Tracking Rates: Sidereal, Lunar, Solar, Alignment-Free Solar Tracking
Slewing Speeds: 0.5X, 1.0x, 8.0x, 16x, 32x, 64x, 128x, 400x, 800x
Tracking Mode: Dual Axis Tracking
Motor: DC Servo Motor, Gear Ratio 6480
Payload Capacity: 5kg
Saddle: Accepts 45mm Sky-Watcher/Vixen type dovetail
Interface: SynScan Hand Control Port, DSLR Shutter Release Port (optional cables available separately), Built-in Wi-Fi Module
Connectivity:  ASCOM platform for Windows PC, Mobile planetarium App for iOS and Android ( SkySafari Plus/Pro, more are coming).
Network Protocol: UDP, Port 11880
Tripod/Mount Fitting: 3/8″ Screw Fitting
Tripod: Adjustable Aluminium with Accessory Tray
Height of Tripod/Mount (excl. OTA): 80.5cm – 152cm
Mount Head Weight: 1.3kg
Total Weight with Tripod: 3.9kg
Power Requirement: 8 AA Size Batteries (not supplied) or External Power Supply (DC 7.5~14V, 0.75A) Tip Positive.

Appearance, equipment

The mount is delivered in a large cardboard box with dimensions 116.0 × 23.5 × 25.0 cm and a weight of 6 kg.

Options:
– mount head
– aluminum tripod
– extension tube for installing telephoto telescopes (column)
– tray for accessories (shelf)
– cable for SNAP port (for Canon cameras)

Комплектация монтировки Sky-Watcher AZ-GTi
Complete set of mounting of Sky-Watcher AZ-GTi (except for the tray for accessories)

The mount is very light and compact. The weight of the mount head without batteries 1.28 kg, with 8 AA batteries Panasonic Eneloop 2450 – 1.56 kg. Length width height in cm – 17 x 11 x 16. In the lower part there is a thread for a photo bolt 3 8 ” .

Монтировки Sky-Watcher Star Adventurer и AZ-GTi
Sky-Watcher Star Adventurer and Sky-Watcher AZ-GTi

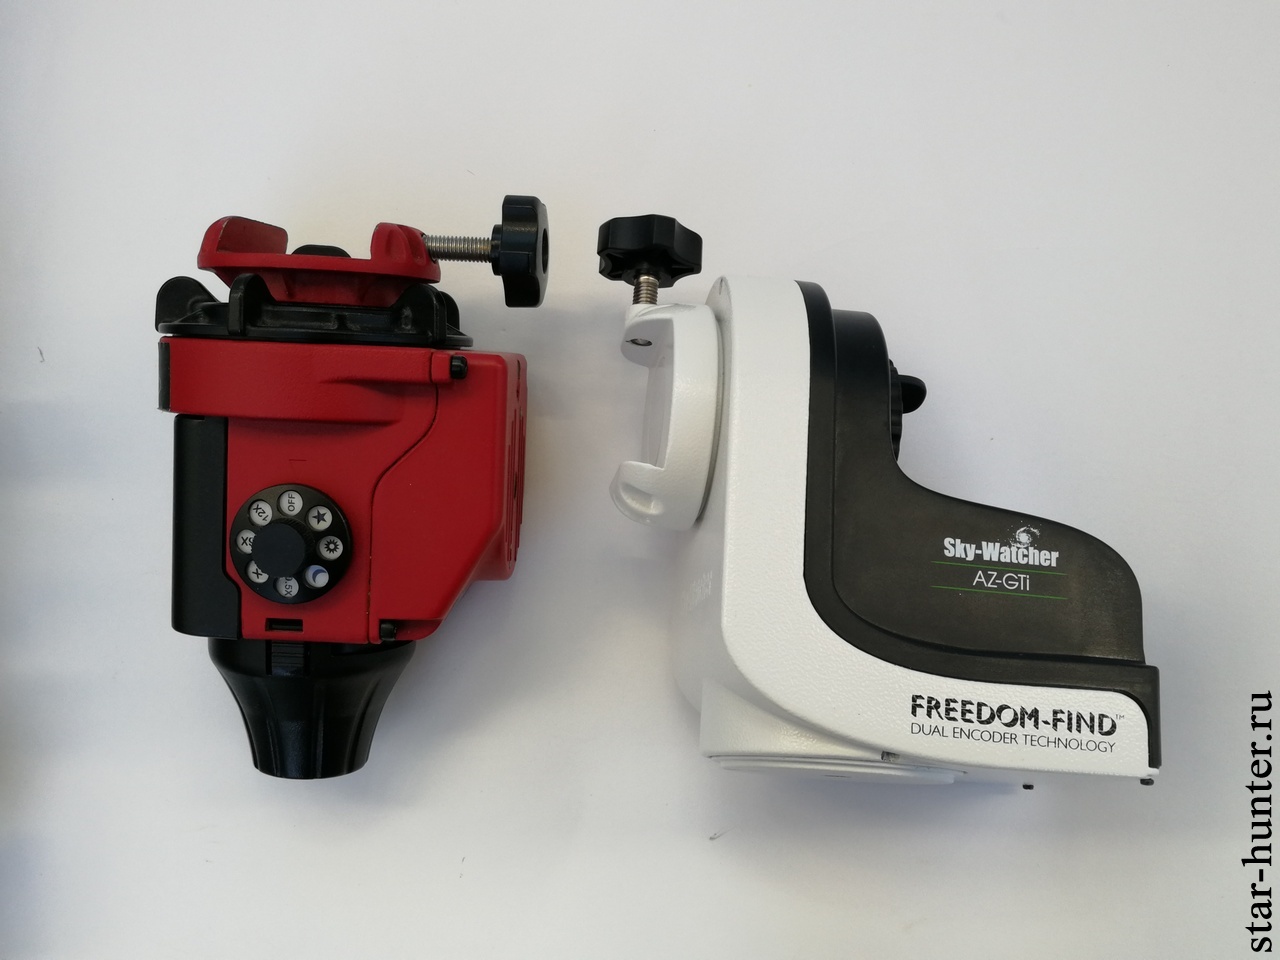
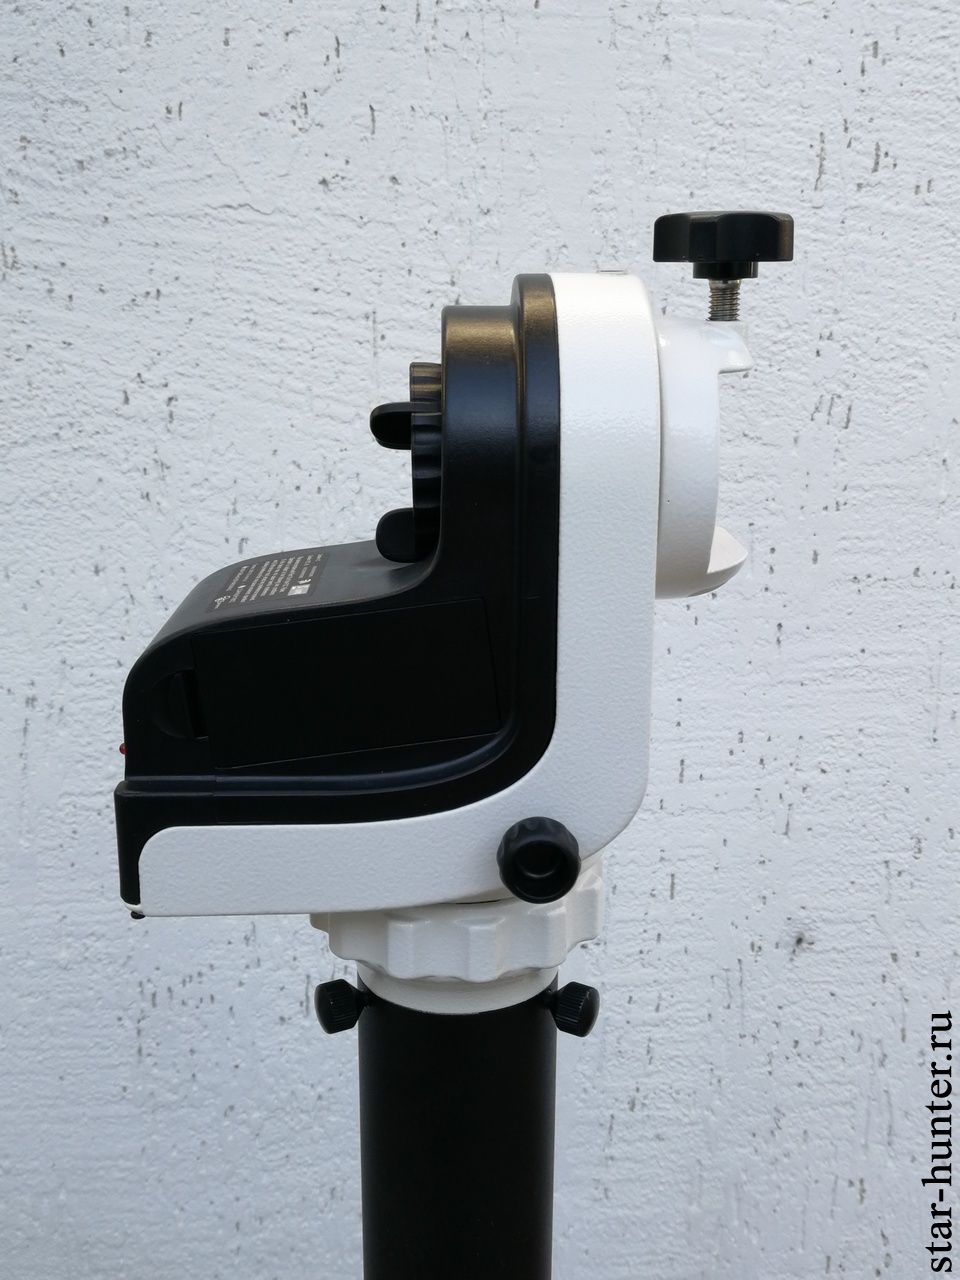
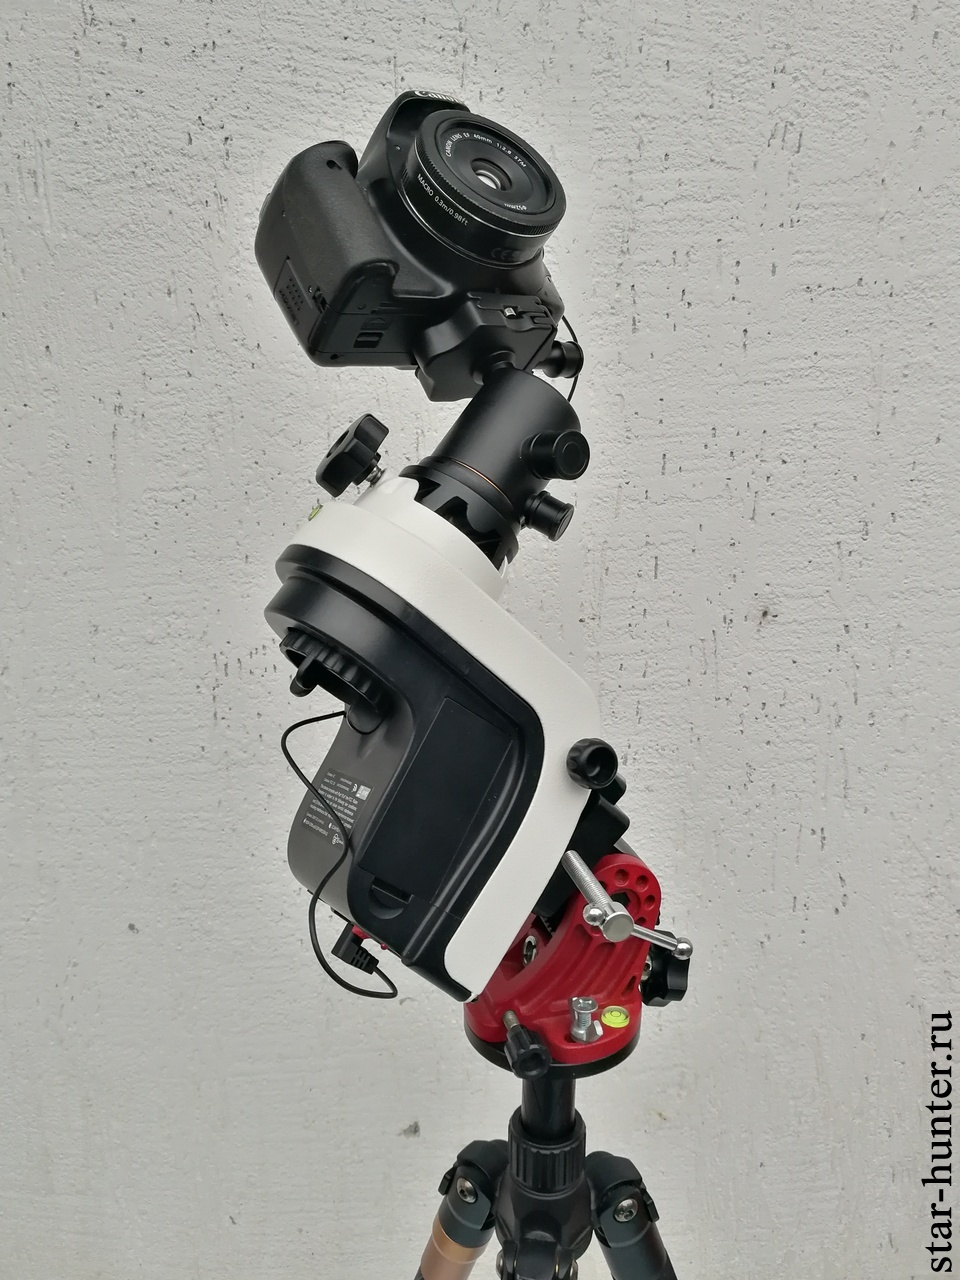
On the side of the case there is a knob for adjusting the axis clamp in azimuth. In the upper part on the side there is a height adjustment wheel with a hole for the counterweight axis with M12 thread. On the same side in a row are the connectors for the remote, power, camera control, power button and status LED. The white part of the mount is metal, the black part is plastic. The workmanship is good, it does not play anything, does not hang out and does not rattle. I just can’t believe that two motors, encoders, Wi-Fi were pushed into such a baby right away, and there was still room for batteries. It looks nice and neat. I did not disassemble the mount, but judging by the pictures from the cloudynigths forum, everything is also neat inside.

Разъемы монтировки Sky-Watcher AZ-GTi
Sky-Watcher AZ-GTi connectors
Крепежная площадка монтировки Sky-Watcher AZ-GTi
Mount pad Sky-Watcher AZ-GTi
Стопорный винт азимутальой оси монтировки AZ-GTi
Sky-Watcher AZ-GTi. Battery cover visible.

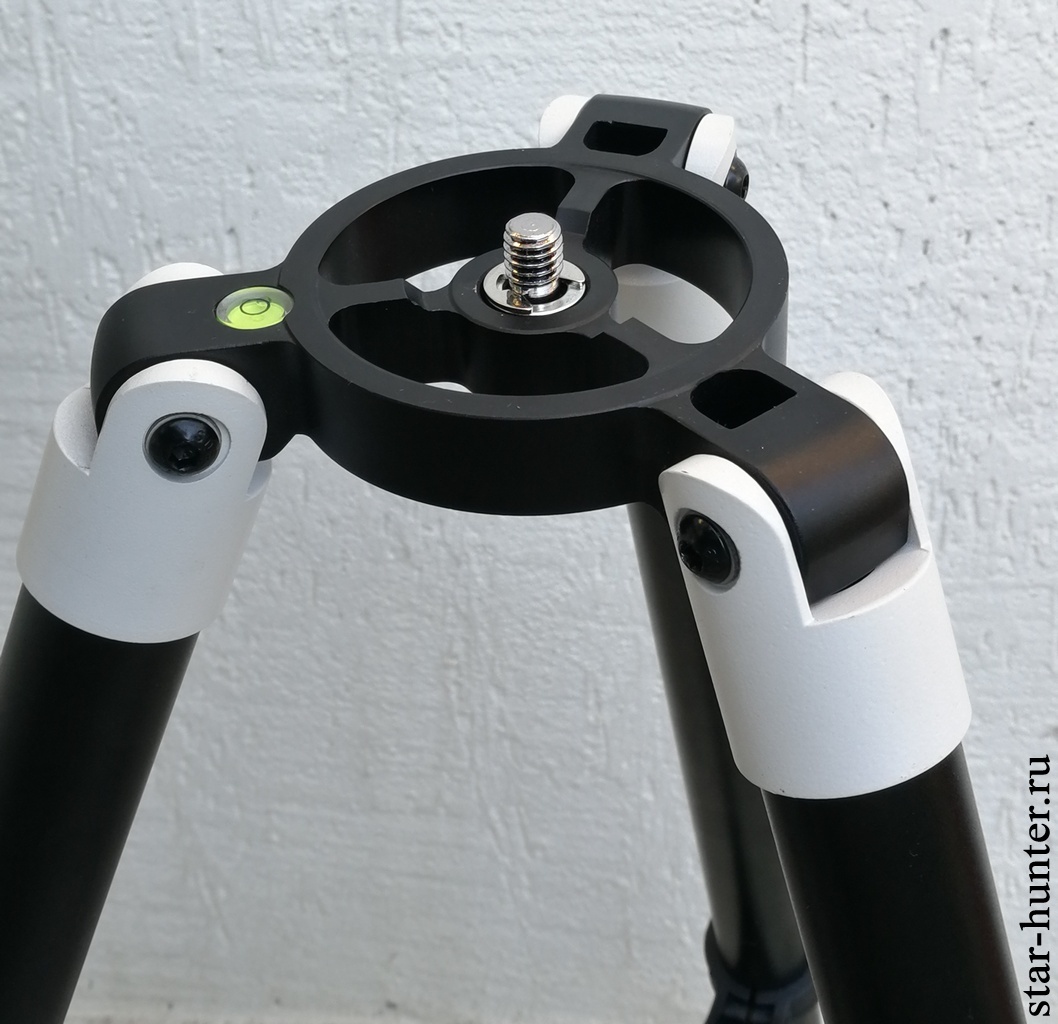
Metal tubular tripod. The total assembly weight is 3.9 kg. By loosening the collet, you can enlarge the length of the tripod. The height of the mount can be adjusted from 80 to 152 cm. The tripod extensions are made of plastic, while loosening the collet, hold the leg with your other hand. With extensions marks should be handled more carefully.

Пластиковые растяжки треноги
Plastic tripod extensions

Platform with a bolt 38

Телескоп Sky-Watcher BK705 на монтировке Sky-Watcher AZ-GTi
Sky-Watcher BK705 on Sky-Watcher AZ-GTi
Телескоп Sky-Watcher BKP1145 на монтировке Sky-Watcher AZ-GTi
Sky-Watcher BKP1145 on mount Sky-Watcher AZ-GTi. Axis and counterweight from EQ1.
Телескоп Celestron Omni XLT 127 на монтировке Sky-Watcher AZ-GTi
Celestron Omni XLT 127 on Sky-Watcher AZ-GTi
Телескоп Sky-Watcher SK90 Mak на монтировке Sky-Watcher AZ-GTi
Sky-Watcher SK90 Mak on Sky-Watcher AZ-GTi
Камера Canon 550D с фотообъективом Canon EF 402.8 STM на монтировке Sky-Watcher AZ-GTi
Canon 550D with Canon EF 402.8 STM lens on Sky-Watcher AZ-GTi


Features
In azimuth mode, the Sky-Watcher AZ-GTi mount is suitable for visual observations and lunar-planet astrophotography. However, field rotation hinders capturing with long exposition in the AZ mode  – azimuthal mount effect, in which all the stars in the image rotate around the center of the field of view. To eliminate field rotation, it is necessary to use a rare or expensive derotator (a device that slowly rotates the camera around an axis), or an inexpensive equatorial wedge (which transfers the mount to EQ mode). It is easier and cheaper to use the Sky-Watcher equatorial wedge, with which the Sky-Watcher AZ-GTi mount is almost completely compatible. The only caveat – it is necessary to replace the clamping screw on the wedge with another (with a thin handle), a screw bolt or a folding bolt, otherwise the mount head will cling to it. Also you can try wedge from iOptron – there is no problem with screw.

Родной винт клина мешает работе монтировки AZ-GTi и может привести к поломке
Default wedge screw interferes with the AZ-GTi mount and may cause damage
Другой винт
Another screw

A polar finder is not provided for this mount. For azimuthal mounting it is not needed, however, in the equatorial mode, installing the polar axis without a finder turns into a rather complicated task. There are several ways to solve it.
1. The first method is to use the built-in polar axis settings through the SynScan Pro application or the remote control. To do this, bind to 2 or 3 stars, find in the remote control menu “Calibrate polar settings”. Next, the mount will be guided several times on the reference star with a proposal to adjust the height and azimuth of the polar axis. Through several repetitions, it is possible to achieve the accuracy of setting the polar axis of about 1 minute of the arc. I have not tried this method yet, but I will definitely try.

2. The second method – an astro camera with a CCTV lens (focal length from 25 mm) and the SharpCap application version 2.9 act as a pole finder. The camera with the lens can be mounted on the telescope body, on the dovetail or on a special holder. In the process of setting up, it is necessary to point the camera at the North Star and turn the mount on the Ra axis 90 degrees. The application will indicate in which direction to turn the screws on the equatorial wedge so that the mount looks exactly at the pole of the world. Repeat if necessary. The method is very simple and fast, but it requires a computer.
3. The third method is an optical pole finder + special mount. However, the mount axis and the finder may not match.

I use the second method, but if the polar star is unavailable, I will try to use the first one.

You can also attach an axis and a counterweight to the mount – they are suitable from the mount of Sky-Watcher EQ1 with M12 thread. This is necessary for the equatorial mode. In azimuth mode, the counterweight can be omitted.

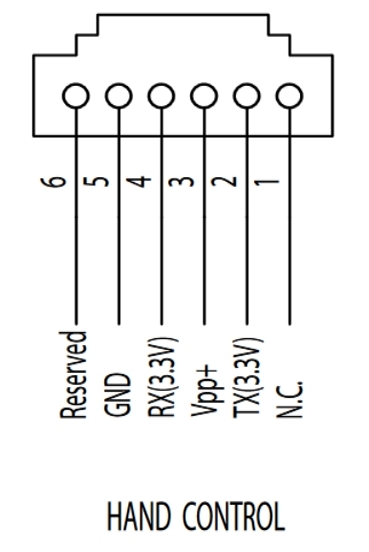
ATTENTION! When using the Synscan hardware console, the pinout is different from the standard! It is necessary to crimp the cable according to the following diagram, otherwise the mount electronics may be damaged. Be careful!

Корректная схема обжатия кабеля для монтировки Sky-Watcher AZ-GTi
Correct cable crimping scheme for mounting the Sky-Watcher AZ-GTi

SynScan Pro app
The SynScan Pro application is used to control the mount. I really liked it – intuitive, with many settings, and in russian/english language. It is free and contains more than 10,000 celestial objects, including planets, the Sun, the Moon. There are catalogs Messier, NGC, IC, Caldwell, double stars, as well as stars with names.

However, there are several nuances.
1. On devices with on-screen navigation buttons, the application does not start in full screen mode. This creates certain inconveniences when trying to use the telescope control buttons “blindly”, that is, without looking at the phone. I wrote to the developers of the application with a recommendation to add full-screen mode, however, I was advised in the settings to simply push the buttons up. As a result, I rummaged a bit in the phone settings and found a forced hide of the navigation buttons.

2. In order to the solar alignment, it is necessary to activate the corresponding item in the settings and solve the captcha (summing a pair of two-digit numbers). Moreover, the next day, the settings are reset and to activate the solar reference you need to go back to the menu and solve the example. For me personally, this is very inconvenient, because I try to observe and shoot the Sun every clear day. Application developers responded that “Sorry, we have to keep the solar observering enabled / disabled feature for the safety of our customer and ourselves. Some of our customers are not professionals”.

The SynScan Pro for Windows application is completely similar to the application on a mobile device, with the difference that the location must be specified manually.

 Приложение SynScan Pro для Windows
SynScan Pro for Windows

Testing
I use 8 Panasonic Eneloop 2450 batteries to power the mount. There is a battery compartment on the side of the mount. You can also use a 12 V power supply unit, or Powerbank with a 12 V output. It should be noted that in standby mode, the mount consumes very low current, so the external powerbank must be low current mode, and not all external batteries will work with the mount. Before buying a powerbank, check the operation in conjunction with the mount.

Before use, the mount should be aligned to a small bubble level in the upper part of the housing. With standard firmware, the optical tube should be on the left side of the mount. After firmware flashing to AZEQ mode, the optical tube should be on the right. Before tying the mount in azimuth mode, it is necessary to set the tub in a horizontal position, and also point it to the south (if it is without updating the firmware, it should be directed to the north). It is not necessary to indicate the time and coordinates of the place of observation – the mount will take them from the phone itself. Then tighten the locking screws on the mount. After switching on in azimuth mode, an alignment should be made. We select the object from SynScan Pro app, the telescope will hover in the approximate area of ​​the object. Next, by clicking the arrows in the application, we move the object into the center of the field of view and confirm the alignment.

The initial position when working in the equatorial mode is different
-the axis of direct ascent is directed to the North Pole of the world (in the Northern Hemisphere) or to the South pole (in the Southern Hemisphere)
– the counterweight bar should look down – the telescope is pointing to the North pole of the world (in the Northern Hemisphere) or to the South Pole (in the Southern Hemisphere).

In the simplest case, if you want to observe only the Moon or a known planet, you can make alignment on them. That is, they turned on the telescope, made an alignment on the Moon and observe it. However, it will be more accurate to alignment on two or three stars. In addition, in the process of observation, you can make additional alignment to the already observed objects, due to which the accuracy of Go-To will be even higher. The alignment is very simple and intuitive – even a beginner can easily cope with it. I recommend that you pre-install any starry sky map on your phone for orientation by constellations and bright stars.

As for accuracy, when I first used it in azimuth mode, I made an alignment by the Moon. Next, I suggested the mount to aim at Saturn (angular distance of about 80 degrees). To my surprise, the planet immediately came into view of the eyepiece at a magnification of 125x. Fine!

At maximum speed, the mount is quite noisy. A buzzing and rattling sound is heard. The sound along the axis of heights is uniform, along the azimuth – with periodic changes in tone. At stellar speed, the mount makes almost no sounds. The mount uses DC drives.

I really liked the ability to activate alighnment-free star tracking. In the SynScan Pro application, you can select the siderial or lunar speed of rotation of the mount. That is, it is enough to set the polar axis, turn on the tracking, and you can start observing / shooting. However, after binding, it becomes possible to automatically aim at the object, which will save time. In general, everyone can use the mount for the desired scenario.

As mentioned earlier, when the axle retaining screws are loosened, the mount can be rotated by hand. At the same time, a noticeable effort is required – the mount will not rotate from a light touch of the finger on the optical tube, and at rest the mount will seem to “stick”. Most likely, such a tight rotation is necessary to reduce backlash. That is, it is not comfortable to observe with manual operation without control from the remote control. In my opinion, this function is useful for manually pointing to an object with subsequent correction by additional correction from the remote control or application.

If you activate additional encoders in the application settings, then after pointing with your hands, the binding will not be lost. To improve the accuracy of Go-To, the manufacturer recommends disabling additional encoders.

I really liked the load capacity of the mount. She can easily carry telescopes weighing up to 3-4 kilograms. With a maximum load of 5 kg, the mount copes well. I used several telescopes on it – Schmidt-Cassegrain Celestron Omni XLT 127, newton Sky-Watcher BKP1145, refractor Sky-Watcher BK705 – all without any problems. Of course, there is shaking from the touch, but it fades quickly.

The Star Adventurer tripod is very lightweight, compact, and fairly stable. Its rigidity is quite enough for visual observations, lunar & planetary astrophotography, as well as shooting with long expositions through a short-focus astrograph (focus up to 500 mm), for example, Sky-Watcher 72ED. If desired, you can replace the tripod with a stronger one – this will positively affect stability and sustainability. Also, the mount head can be mounted on a durable tripod – you get a transportable option for travel.

I also tested the SNAP connector with a Canon 550D SLR camera. Through the SynScan Pro application, you can activate interval shooting with the option of manual shutter speed (Bulb), which allows you to control the camera shooting remotely.

Astrophotography
Thanks to the built-in motors, the Sky-Watcher AZ-GTi can be successfully used for lunar-planetary capturing. After alignment, it will accurately track a celestial object, allowing you to take a picture or record a video. When shooting in azimuth mode due to field rotation, there are restrictions on the duration of the capturing. When shooting the Moon, planets and the Sun, it is about 2 minutes, when shooting with long exposures (nebulae, galaxies, clusters) – about 30 seconds. When using the equatorial wedge, the Moon, the Sun, Mercury, Venus, Uranus and Neptune can be shot much longer, but planets with fast rotation (Jupiter, Saturn, Mars) will still have to be captured for no more than two minutes. Below are some pictures that I took using telescopes mounted on a Sky-Watcher AZ-GTi mount.

Луна, 6 ноября 2019 года, 20:08.
Moon, 06/112019, 20:08.
Солнце в линии водорода. 5 ноября 2019 года, 12:35.
H-alpha Sun. 05112019, 12:35.

The maximum shutter speed depends on a number of factors, namely: weight and windage of the telescope/lens, tripod stiffness, capturing scale (angular seconds per pixel), accuracy of the polar axis setting and the using of autoguiding.

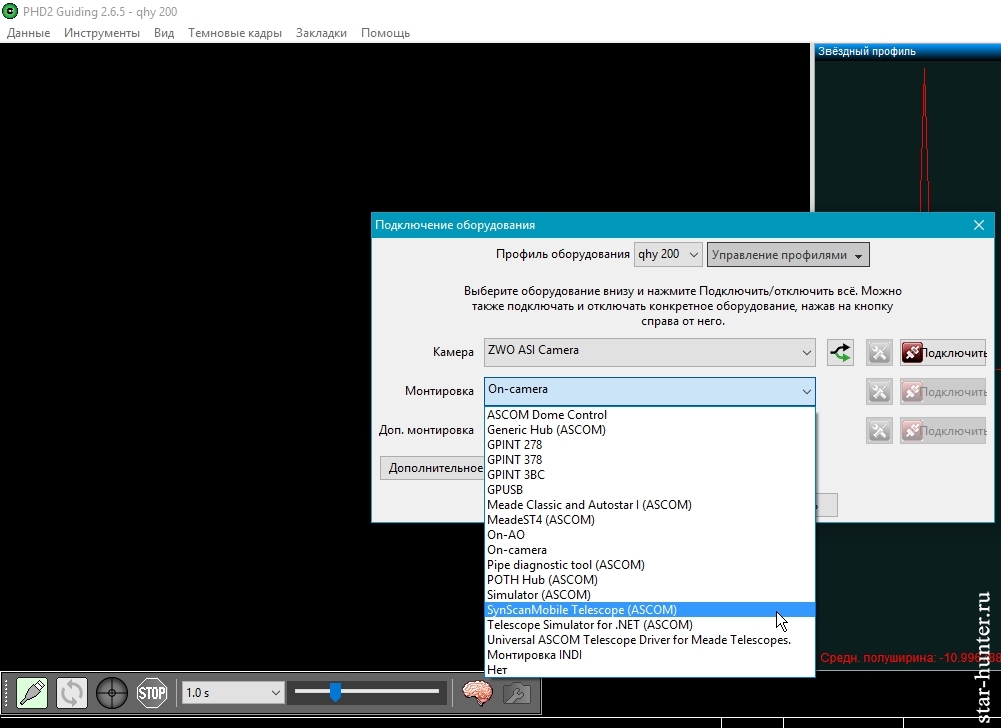
There is no ST4 auto-guide port on the Sky-Watcher AZ-GTi mount, however this is not a problem, since after installing the SynScan App ASCOM driver on the computer, the mount can guide via Wi-Fi. It also allows using astrocams for guiding without an auto guide port. In the guiding program (for example, PHD2), select “SynScanMobile Telescope (ASCOM)” in the mount list. Before starting guiding, you need to download and run the SynScan Pro application for your computer.

Выбор ASCOM драйвера монтировки в меню PHD2
ASCOM mount driver selection in the PHD2 menu

For autoguiding I use the Sky-Watcher 8×50 finder and the QHY5III178m camera. When calibrating the guide, it turned out that there is a big backlash along the DEC axis – the program refused to calibrate. On the RA axis, the play is noticeably less, but there is one. So far, managed to configure guiding on only one axis (Ra). I will also try to adjust the backlash compensation in the settings of the SynScan app.

Later, I tried to take sky shots using the Samyang 135 2.0 ED photo lens (focal length 135 mm), the Svbony CLS clip EOS-C filter and the Canon 550D camera (pixel size 4.3 microns). I made the installation of the polar axis using the SharpCap application, the QHY5III178m camera and the 25 1.4 CCTV lens. The shooting time was 47 minutes with shutter speeds of 1 minute – 47 frames were obtained.

Одиночный кадр 60 секунд
Single shot 60s without autoguiding

13 frames were defective (28%). Below is an animation of moving stars on a small fragment of the frame. You can see how the star “walks” left and right. The upward shift is due to the not entirely accurate installation of the polar axis.

GIF

Autoguiding can significantly reduce the percentage of defective frames, compensate for periodic errors and inaccuracies in the installation of the polar axis, thereby maximizing shutter speed can be increased. This requires additional testing, I will write about this when using the mount further. However, judging by the numerous images of other astrophotographers, with a Sky-Watcher AZ-GTi mount and 72 mm apochromat, in the presence of guiding, shutter speeds of up to 500-600 seconds can be achieved. So the potential of the mount is very large.

Summary
I really liked the Sky-Watcher AZ-GTi mount because of its compactness, light weight, ease of setup and excellent functionality. For the money you get a modern motorized mount with the ability to wirelessly control. The mount works stably, there were no spontaneous outages and disconnections. The lifting capacity of the mount with its size and weight impressed even an experienced amateur astronomy. SynScan Pro application is intuitive and has many settings, it is easy to master even for a beginner. However, keep in mind that for astro photography with long exposures in the equatorial mode, you need to buy an equatorial wedge, an axis with a counterweight, and also a wedge bolt without protruding parts. A pole finder with pad or astro camera + CCTV lens is also very desirable for quick and accurate exposure of the polar axis.

Polar finder adapters: for optical polar finder and for electronic polar finder (CCTV lens + cam).

Additional materials:

Manual for Sky-Watcher AZ-GTi
SynScan Pro app: Android, iOS, Windows
Firmware
ASCOM-driver SynScan App
I also recommend that you read the manual for the SynScan hand control – the SynScan Pro application repeats its functionality in many ways.

80 thoughts on “Sky-Watcher AZ-GTi mount on the Star Adventurer tripod review”

  1. Евгений

    Руслан, добрый день.

    Подскажите пожалуйста, а что из ШК / МК будет более-менее комфортным для визуала с этой монтировкой? Хотелось бы подобрать еще компактный, но в то же время уже серьезный инструмент для наблюдений, который при этом даст ощутимый прирост деталей в дипах и планетах по сравнению с 72/90 мм рефракторами. Читал на форумах, что народ вешал и 6″, и даже 8″ ШК, но есть некоторые сомнения на сей счет.

    Сейчас пользуюсь AZ-GTi на штативе Innorel RT80C вместе с Levenhuk Ra R72 ED и Synta BK909 – очень доволен.

    1. Здравствуйте. Celeston Omni XLT 127, либо мак 127. На пределе – ШК Celestron C6 (или труба от Celestron Nexstar 6 SE). 8″ ШК точно вешать не надо, а вот ШК 6 от Celestron по планетам\Луне и для визуала вполне потащит.

  2. Добрый день, Руслан!
    Мы ранее общались в Инсте (Юрий, popular_astronomy). Я дозрел до покупки AZ-GTi. Сейчас у меня SW MAK90EQ1 на родной алюминиевой треноге. Я хочу купить только монтировку без треноги и использовать её со своей треногой.
    Вопрос 1. Я не вижу в продаже AZ-GTi без треноги в России. Безопасно ли купить на AliExpress, например, тут – https://aliexpress.ru/item/1005001511141364.html (на данный момент 28705 руб.)? Не втюхают ли подделку?
    Вопрос 2. Чтобы поженить AZ-GTi с моей треногой от МАК90EQ1 – что нужно? Просто винт большей длины? Точнее сказать, женить надо не саму монтировку, а колонну (я её тоже куплю), но я полагаю они крепятся одинаково.
    Вопрос 3. Сама труба телескопа сейчас крепится к EQ1 иначе, у неё не “ласточкин хвост”, а двумя винтами прикручивается. У Вас тут выше есть фото МАК90 на AZ-GTi – https://star-hunter.ru/wp-content/uploads/2019/11/IMG_20191010_192057.jpg – где видна жёлтая пластинка между трубой и монтировкой. Не подскажете, где взять такую пластину или как она правильно называется / какие искать параметры?
    Заранее спасибо большое за ответы!

    1. Попробую ответить сам на свои вопросы. ))
      ПО ВОПРОСУ 1. Монтировка по указанной выше ссылке пришла. Испытал в работе уже дважды – во время лунного затмения в режиме “найти и отследить” и позже по планетам уже с полноценной привязкой по трём звёздам. На подделку не похожа. Всё работает чётко, после привязки планеты находила достаточно точно, люфтов по осям не чувствуется.
      Почему-то после привязки не попадала в Луну, ошибка буквально в градус небесной сферы. Возможно, потому что я совсем не выставил треногу по уровню (хотя, по идее, привязка по трём звёздам должна была это компенсировать). Но Уран и Нептун нашла очень чётко!
      ПО ВОПРОСУ 2. На треногу от EQ1 я поставил так: купил винт М6 90 мм, вставил его изнутри колонны вниз и снизу треноги закрутил его барашковой гайкой. Цена вопроса несколько рублей и держит прекрасно. Нужно только ещё прокладку из мягкой резины между треногой и колонной, иначе при усилии может провернуться.
      Хочу обратить внимание, что родной винт у треноги EQ1 – не 3/8, а толще, скорее всего, М10. Резьбы не совпадают. Поэтому покупка более длинного винта 3/8 может не помочь без рассверливания треноги. Решение с М6 спасает от уродования треноги, позволяя использовать её и с монтировкой EQ1, и с AZ-GTi.
      ПО ВОПРОСУ 3. Для крепления трубы на монтировку я купил ласточкин хвост 120 мм от SVBony: https://aliexpress.ru/item/1005005270260816.html (винтики и шестигранник идут в комплекте). Хвост крепится не к самой трубе, а к старому креплению без доработок. Так что трубу можно ставить и на EQ1, и на AZ-GTi.
      Эта модель хвоста чуть тоньше (43.5 мм), но зажимается надёжно, проблем нет. Также она чуть длиннее штатного крепления (оно 100 мм), но излишек ничему не мешает.

  3. Евгений

    Здравствуйте Руслан! Задумался о покупке монти Az-Gti, подскажите, можно ли ее подружить со штативом от EQ2? У вас на фото труба от BKP1145 вроде как раз с такой треногой используется.

    1. Здравствуйте. У меня используется тренога от EQ1, у нее площадка плоская. Не помню, какая площадка у EQ2 сверху – если плоская, то подружить получится точно. Нужен будет длинный винт 3\8, можно купить в магазине крепежа. Возможно, потребуются шайбы.

      1. Евгений

        Спасибо! А вообще, какой штатив вы бы посоветовали для этой монтировки? Планирую использовать ее с Sv503 – 80 ED для астросъемки и поглядушек в поездках (т.е. хотелось бы что-то достаточно устойчивое, но при этом не слишком тяжёлое и габаритное).

        1. Я использую в основном родную треногу от SW AZ-GTi. Она поустойчивее, чем тренога от EQ1, всё равно хлипковата. Но хотя бы металлическая и при этом компактная.
          В идеале бы стальную треногу от Celestron CG-4, но там торчащий “шип” для настройки азимута будет мешать. Да и тяжело\габаритно получается.
          Также еще учтите, что в AZ-режиме с обычной треногой труба может “клюнуть” фокусером или трубой треногу. В родной комплектации к AZ-GTi идет еще колонна небольшая, как раз чтобы труба не цеплялась. Но колонна мне не особо понравилась – слабый крепеж, люфты и слабые винты (один я умудрился сломать).

          Под Sv503 80ED… На мой взгляд, для AZ-GTi она тяжеловата будет для EQ режима. Мне показалось, что она в AZ-режиме уже на пределе тянет эту трубу.
          60-66 мм апо для неё оптимальны. Разумный предел – короткий 70 мм апо. Да, на AZ-GTi вешают и 102 мм апо, и Шмидты 203, но я не вижу в этом смысла – и монтировке тяжело, и стабильность никакая.

          1. Евгений

            Т.е. в плане трубы лучше смотреть что-то вроде sv503 70ED или Sky Rover 72ED? Эти варианты по цене вроде самые доступные из полу-апо. 80ED я пока не покупал, только присматриваюсь)

            Просто Az-Gti по обзору очень понравилась, прям то что нужно для моих нужд, но не хотелось бы прогадать с весом самого телескопа.

          2. Я бы даже посмотрел в сторону SkyRover 60ED, она для AZ-GTi прямо оптимальна. К этой трубе лучше брать родной редуктор 0.8х, с ним картинка более качественная.

      2. Евгений

        Спасибо! А какой штатив для этой монтировки вы бы посоветовали? Планирую использовать ее с трубой sv503 – 80 ED для астросъемки и погляделок в поездках (т.е. хотелось бы что-то достаточно устойчивое, но не слишком тяжёлое и габаритное). Тренога от EQ2 все же больше временный вариант.

  4. Здравствуйте, подарили мне данную монтировку, но при привязке телескоп уходит вниз, не понимаю как это исправить, но после доводки на объект все нормально, пузырьковый уровень проверял, все нормально, при координатах 0 градусов телескоп смотрит вверх, хотя должен находится на севере по горизонту. Подскажите что я мог сделать не так. Заранее спасибо.

    1. Здравствуйте. Странно. Какое стартовое положение у телескопа перед привязкой? Трубой на север, труба горизонтально? Если монтировку не прошивали в EQ режим, то труба должна быть установлена с левой стороны монтировки (если смотреть со стороны окуляра).

  5. Андрей

    Добрый вечер! Немного не по теме, но в целом про монтировку. Ищу крепежные кольца для рефлектора 130мм. Но что-то нигде не могу найти. Есть варианты для 114мм и для 150мм. Удивительно, что внутренний
    диаметр у них одинаков – 140мм. По идеи тогда и для моей трубы эти кольца должны подойти…? Спасибо.

        1. Андрей

          Добрый день еще раз! У вас тут в ссылке кольца с внутренним диаметром 235мм скорее для 200мм Ньютона. Но рефлектор 130мм они тоже способны зажать?

          1. Здравствуйте. Странно, выбирал вроде ссылку на кольца для 130 мм трубы. Возможно, продавец изменил содержимое товара. Вообще, али в РФ ужасно работает, испортили сайт напрочь.
            Кольца 235 мм, разумеется, на вашу трубу не подойдут.

  6. Денис

    Руслан, здравствуйте!
    Тренога от eq1 подойдёт для данной монти?

    1. Здравствуйте. Подойдёт, но надо будет обязательно купить длинный винт 3/8 дюйма. И отверстие в основании монтировки рекомендую рассверлить немного, чтобы винт можно было протолкнуть. Либо резьбу на винте немного сточить, чтобы она была только в начале.

      1. Денис

        Спасибо! Трубу же можно будет установить SW1149? И там ведь надо ещё докупить крепление ласточку для телескопа? У меня просто монтировка eq1.

        1. Технически да. Практически – труба будет упираться в треногу, если навести на достаточно высокий объект. Колонна немного поможет, но все равно длинная труба будет цеплять штатив.

          1. Денис

            Хорошо, спасибо. Просто эта монтировка более доступна по финансам. В раздумьях)

          2. Можно поискать б/у Sky-Watcher AZ-GT, либо Celestron SLT, у них другая конструкция (полувилка), ещё и со сдвигом относительно центра. Вообще, под 1149 трубу лучше поискать треногу покрепче, тренога от eq1 тянет её на пределе. И то, если не либо выдвигать саму треногу.

  7. Владимир

    Скажите, а монтировке разве все равно, справа или слева от нее расположена труба?
    У меня вроде-бы корректно работает только при положении труба слева, винт ласточкина хвоста вверху.
    Или я что-то не так делаю?

    1. По умолчанию левая сторона основная. Можно установить прошивку, где рабочей становится правая сторона, а также добавляется режим EQ.

      1. Артем

        А с какой стороны должен быть винт ластохвоста? Я трубу повесил слева, но стальная защитная пластина на трубе стоит так, что винт снизу.

        1. Зажимной винт может быть и сверху, и снизу – как удобно. Перед установкой трубы на монтировку ослабьте боковой чёрный ребристый винт и поверните крепёжную пластину так, как пожелаете.

          1. Спасибо! Проверил на первом балконном тесте, все работает отлично.
            Пробовал поженить SynScan со Stellarium, но при наведении монтировка уходила вправо и всегда на один угол. Потом дошло, что это из-за ошибки компаса на планшете.
            Повесил на эту монтировку с родными ногами 102 рефрактор. Для визуала прекрасные сетап, для фото посмотрим.

            Руслан, у меня вопрос по люфтам – есть заметный по восхождению. Норма для этой “головы”? И на сколько примерно хватает батареек?

          2. 1. По люфтам – как повезет. У меня на восхождении люфт минимален, а вот по склонению значительный, вплоть до проблем с гидированием. У двух знакомых с люфтами всё ок, миниальны по двум осям, гид прекрасно калибруется. В принципе, при гидировании люфт по восхождению некритичен, т.к. монтировка либо ведет, либо останавливается – главное, чтобы червяк толкал шестерню (восточная часть монтировки должна быть чуть тяжелее западной в EQ режиме).
            2. По батарейкам – не проверял, если честно, т.к. пользуюсь адаптером USB 5В-12В + Powerbank на 20000, хватает ОЧЕНЬ надолго, моторы кушают мало при слежении.

  8. Андрей

    Здравствуйте, подскажите на сколько родные ноги от этой монти лучше / хуже алюминиевых от EQ3-2?
    Если была возможность сравнить конечно.
    Есть как раз алюминиевые с переходником, хочу понять имеет ли смысл заказать родные.

    1. Привет. Родные ноги, разумеется, более хлипкие. Однако более компактные и легкие.

      1. Андрей

        Спасибо.
        Тогда просто в комплект докуплю, для мобильности.

        1. Учтите, что на али треногу от AZ-GTi иногда продают укороченную – например, вот тут коротыш прям http://alli.pub/6fdx4s
          Покупал её, намного короче, чем родная от AZ-GTi.

  9. Андрей

    Руслан, здравствуйте. Приобрел монтировку AZ-GTi с экваториальным клином для своего телескопа levenhuk skymatic 105 gt. Докупаю противовес.
    Подскажите по какой формуле расчитать противовес?

    1. Привет! О, поздравляю! А так ли нужен экваториальный режим для этой трубы? По Луне и планетам в AZ режиме все неплохо получается, а для дипов мак все же темноват, а фокус великоват.
      По противовесу – он должен быть примерно равен массе самой трубы или немного меньше.

      1. Спасибо, всегда помогаете. Ну тогда попробую потестить в AZ режиме.

      2. Андрей

        Руслан, здравствуйте. Подскажите, когда установливаю зеркалку (canon 550) на трубу монтировка не регулируется вверх по вертикали, видимо тяжело (т.е. звук идет моторчик крутится, но труба стоит на месте). Это же тоже решит установка противовеса?*Это я все делаю без экваториального клина.

        1. Здравствуйте. Странно. Противовес тут не поможет. А боковую ручку затягивали? Как с балансировкой обстоят дела при ослабленном винте?

  10. Александр

    Доброго времени суток! Руслан, подскажите, пожалуйста, ваша фотография М42 без гидирования – получена в азимутальном режиме? насколько большими могут быть выдержки при использовании азимутальных монтировок для deep-sky?

    1. Здравствуйте. М42 получена в экваториальном режиме.
      В AZ режиме при выдержке 30с и фокусе 135 мм (камера Canon 550D) звёзды по краям начинают закручиваться из-за вращения поля. Пожалуй, 30 секунд – это разумный предел для азимутальной монтировки.
      В планетном режиме вращение поля менее заметно, я добивался длительности роликов от 2 (по Луне и планетам) до 20 минут (Венера, Сатурн), и это с 200 мм телескопом (но на другой монтировке). Но вращение поля зависит еще от положения объекта.

      EQ режим, разумеется, предпочтительнее.

  11. Денис

    Здравствуйте. Заказал себе az gte. Подскажите, пожалуйста, реализовано ли для данной монтировки гидирование через приложение, или нужно ноут?
    Еще вопрос по гиду. В наличии есть искатель 7х50 с перекрестьем. Какая камера для него подойдет. Там сзади отверстие с резьбой, в которое не вставляется окуляр 1.25. Нужен какой то переходник? Как фокусироваться? И не помешает ли перекрестье?

    1. Здравствуйте. Нужен ноутбук. Если для управления монтировкой используется микрокомпьютер ASI Air, то гидировать можно через приложение ASI Air.
      Нужен хитрый переходник с резьбы на T2 или 1.25″ выход.
      https://www.teleskop-express.de/shop/product_info.php/language/en/info/p9135_Lacerta-T2-Adapter-for-50-mm-finders-for-conversion-into-a-guide-scope.html
      Под такой переходник можно взять астрокамеру-шайбу (типа ZWO 120 MM-S). Можно попробовать поискать такой переходник на али.
      Если камера будет в формате 1.25″ носика, то к ней еще надо вот такой адаптер http://ali.pub/34ebh1 или такой http://ali.pub/2tr45i
      Перекрестье выкручивается вместе с окуляром.

  12. Роман

    Руслан, как Вы думаете, потянет AZ-GTi телескоп Sky-Watcher 909?

    1. Потянет. Но труба длинная и наблюдать неудобно будет, так как окуляр будет низко. Кроме того, про наблюдении высоких объектов труба будет цеплять треногу.

      1. Роман

        Спасибо! Какую-нибудь проставку придётся мутить, чтобы трубу приподнять, или штатив подходящий искать. Похоже, что та же Star Adventurer подойдёт…

        Да, по заявленной грузоподъёмности, 909ю трубу поднимет, но меня смущает длина и инертность трубы, хватит ли моторчиков и “тормозов”, чтобы длинную трубу точно наводить?

        1. К AZ-GTi обычно в комплекте идет проставка (колонна). Моторчиков хватит, не переживайте.

  13. Денис

    Как раз выбираю между SW Adventurer (белой) и SW AZ-GTi – походного сетапа для астрофото с фотообъективами. Заинтересовала возможность управления через wi-fi. Как я понял потенциал у AZ-GTi больше, но качество механики может свести все преимущества на нет. В пользу SW Adventurer говорит наличие встроенного искателя полюса. Что бы вы посоветовали? Какой вариант вам больше нравится?

    1. Лично мне SW Adventurer нравится встроенным искателем полюса и быстрой готовностью к работе – выставил полярку и снимай.
      С AZ-GTi надо будет повозиться – или программным способом полярку выставлять, или докупать внешний искатель полюса и приделывать крепление под него.
      Кроме того, к AZ-GTi надо еще клин докупить, противовес и ось (подходят от EQ1, если не ошибаюсь). SW Adventurer в этом планет приятнее – можно купить Astrophoto pack, где всё нужное будет в комплекте.

      Теперь о плюсах AZ-GTi – по грузоподъемности она всё же получше. Есть Wi-Fi, Go-To, двойные энкодеры. Приложение очень простое и понятное.

      Если нужна монтировка 2-в-1, то есть и азимуталка, и мини-трекер, то AZ-GTi. Если нужен именно больше трекер, чем монтировка, то SW Adventurer.

  14. Денис

    Здравствуйте, Руслан. Удалось ли избавиться от люфтов? Каково качество гидирования?

    1. Здравствуйте. Увы, люфт по высоте\DEC не удалось устранить – надо перебирать механику, лезть так глубоко в монтировку не хочется. По Ra гидирует нормально, на уровне SW Adventurer. В остальном монтировка работает без нареканий.

  15. Руслан, спасибо за прекрасный обзор! Подскажите, вращается ли штифт противовеса при вращении телескопа в вертикальной плоскости? Если да, то это позволило бы закрепить камеру на конце противовеса, например с помощью TS-Optics Piggyback Camera Holder

  16. Сергей

    Руслан, какова точность ГоТу данной монтировки в сравнении с Целестрон SE?
    Спасибо.

  17. Павел

    Руслан!
    Хороший обзор, много полезной информации. Спасибо!
    Недавно я купил такую монтировку. Поместил на нее трубу Sky-Watcher BK Mak127S. В принципе, монтировкой я доволен.При настройке горизонта обратил внимание, что если выставить уровень в одном положении и вращать телескоп по азимуту, уровень уходит. Не очень сильно, в пределах половины пузырька. Насколько сильно это влияет на точность наведения? После наведения по звездам, неточная установка уровня дает большую ошибку наведения?

  18. Борис.

    Руслан. Прекрасный обзор! Спасибо большое.
    Подскажите пожалуйста: у меня Sky-Watcher MAK 90AZGT SynScan GOTO, монтировка показывает себя не плохо, но при ведении объекта смещается рывками, как бы дискретно. Это нормально или она все же должна вести объект плавно, по типу электронного часового привода?

    1. Здравствуйте. Сильный ли сдвиг? Увы, с AZGT монтировкой я не работал. Есть опыт работы с Celestron SLT и NexStar SE, Meade LX90 и Sky-Watcher AZ-GTi. Во всех случаях я не припомню рывков при ведении.
      Возможно, есть проблемы с механикой. Телескоп на гарантии?

      1. Борис

        Брал б/у, за очень смешные деньги, протестить было некогда.
        Сдвиги буквально микро, но про длинную выдержку можно не думать, смазывает картинку. Вот и гуглю – может это все аналогичные монтировки так работают.
        Если такого быть не должно поищу сервис.

        1. Ведение на азимутальной монтировке всё равно происходит “ступенькой”, так как объект смещается вправо и вверх\вниз. Да и при таком фокусе (1250 мм) все неточности сразу вылазят на поверхность. При схожем фокусе я снимал на AZ-GTi монтировке короткими выдержками https://star-hunter.ru/orion-nebula-13-03-2020/
          Недавно также снимал в азимутальном режиме с фотообъективом Samyang 135\2 и камерой Canon 550Da – точности ведения хватало для 30с выдержек, но при этом уже начинало сказываться вращение поля (особенность азимутальных монтировок).

          Я дам Вам две рекомендации.
          1. Заменить трубу на фотообъектив (с фокусом до 135 мм). Сойдет недорогой Юпитер-37А. Можно также использовать широкоугольные объективы.
          2. Сделать или купить экваториальный клин. Это позволит использовать монтировку в экваториальном режиме. Если в настройках пульта монтировки это не предусмотрено, можно просто установить в настройках местоположения широту +90 градусов.

          1. Борис

            Спасибо. “Ступенькой” – действительно точное определение!))) Значит с монтировкой всё нормально.
            Ещё раз спасибо!
            Буду пробовать предложенные Вами варианты.

  19. Дмитрий

    Добрый день, Руслан!
    Нет ли у Вас информации в каких температурных режимах работает эта монтировка?

    1. Добрый день. Увы, такой информации производитель не предоставляет. У меня при +5 монтировка работает в штатном режиме. Увы, сильных холодов у нас почти не бывает, поэтому проверить работоспособность при сильном минусе нет возможности.

      1. Дмитрий

        Спасибо за ответ! Попробую уточнить у производителя.

    2. Артём

      Запоздалое сообщение, но всё же…

      До -20 начинаем подмерзать идёт тяжелее, -30 уже не двигается.
      SW Adventurer заметно быстрее сдаётся.

  20. Никита

    Здравствуйте, Руслан. Эта монти сможет выдержать трубу с6 для луны/планет?

  21. Светлячок

    И еще штука для обжима нужна^^
    Солнце красивое.

Leave a Comment

Your email address will not be published. Required fields are marked *

11 − 8 =

 ДАЮ СОГЛАСИЕ НА ОБРАБОТКУ МОИХ ПЕРСОНАЛЬНЫХ ДАННЫХ, С ПОЛИТИКОЙ КОНФИДЕНЦИАЛЬНОСТИ ОЗНАКОМЛЕН 
Scroll to Top